Introduction to NumPy, SciPy, and Matplotlib

Before we can talk about concrete machine learning algorithms, we have to talk about how best to store the data we will chew through. This is important as the most advanced learning algorithm will not be of any help to us if they will never finish. This may be simply because accessing the data is too slow. Or maybe its
representation forces the operating system to swap all day. Add to this that Python is an interpreted language (a highly optimized one, though) that is slow for many numerically heavy algorithms compared to C or Fortran. So we might ask why on earth so many scientists and companies are betting their fortune on Python even in the highly computation-intensive areas? The answer is that in Python, it is very easy to offload number-crunching tasks to the lower layer in the form of a C or Fortran extension.

That is exactly what NumPy and SciPy do (http://scipy.org/install.html). In this tandem, NumPy provides the support of highly optimized multidimensional arrays, which are the basic data structure of most state-of-the-art algorithms. SciPy uses those arrays to provide a set of fast numerical recipes. Finally, Matplotlib (http://matplotlib.org/) is probably the most convenient and feature-rich library to plot high-quality graphs using Python.

Installing Python Luckily, for all the major operating systems, namely Windows, Mac, and Linux,
there are targeted installers for NumPy, SciPy, and Matplotlib. If you are unsure about the installation process, you might want to install Enthought Python Distribution (
https://www.enthought.com/products/epd_free.php) or Python(x,y) (http://code.google.com/p/pythonxy/wiki/Downloads), which
come with all the earlier mentioned packages included.
Chewing data effciently with NumPy and
intelligently with SciPy
Let us quickly walk through some basic NumPy examples and then take a look at
what SciPy provides on top of it. On the way, we will get our feet wet with plotting using the marvelous Matplotlib package.

You will find more interesting examples of what NumPy can offer at

http://www.scipy.org/Tentative_NumPy_Tutorial. You will also fnd the book NumPy Beginner’s Guide – Second Edition, Ivan Idris,Packt Publishing very valuable.

Additional tutorial style guides are at http://scipy-lectures.github.com;

you may also visit the offcial SciPy tutorial at
http://docs.scipy.org/doc/scipy/reference/tutorial.

What you will Learn

This Blog will give you a broad overview of the types of learning algorithms that
are currently used in the diverse fields of machine learning and what to watch out
for when applying them. From our own experience, however, we know that doing
the “cool” stuff—using and tweaking machine learning algorithms such as
support
vector machines
(SVM), nearest neighbor search (NNS), or ensembles thereof—will
only consume a tiny fraction of the overall time of a good machine learning expert.
Looking at the following typical workflow, we see that most of our time will be spent
in rather mundane tasks:
1. Reading the data and cleaning it.
2. Exploring and understanding the input data.
3. Analyzing how best to present the data to the learning algorithm.
4. Choosing the right model and learning algorithm.
5. Measuring the performance correctly.
When talking about exploring and understanding the input data, we will need a
bit of statistics and basic math. But while doing this, you will see that those topics,
which seemed so dry in your math class, can actually be really exciting when you
use them to look at interesting data.
The journey begins when you read in the data. When you have to face issues such as
invalid or missing values, you will see that this is more an art than a precise science.
And a very rewarding one, as doing this part right will open your data to more
machine learning algorithms, and thus increase the likelihood of success.
With the data being ready in your program’s data structures, you will want to get a
real feeling of what kind of animal you are working with. Do you have enough data
to answer your questions? If not, you might want to think about additional ways to
get more of it. Do you maybe even have too much data? Then you probably want to
think about how best to extract a sample of it.Often you will not feed the data directly into your machine learning algorithm.Instead, you will find that you can refine parts of the data before training. Many
times, the machine learning algorithm will reward you with increased performance.You will even find that a simple algorithm with refined data generally outperforms a very sophisticated algorithm with raw data. This part of the machine learning workflow is called
feature engineering, and it is generally a very exciting and
rewarding challenge. Creative and intelligent that you are, you will immediately see the results.


Choosing the right learning algorithm is not simply a shootout of the three or four that are in your toolbox (there will be more algorithms in your toolbox that you will see). It is more of a thoughtful process of weighing different performance and functional requirements. Do you need fast results and are willing to sacrifice quality? Or would you rather spend more time to get the best possible result? Do you have a
clear idea of the future data or should you be a bit more conservative on that side? Finally, measuring the performance is the part where most mistakes are waiting for the aspiring ML learner. There are easy ones, such as testing your approach with the  same data on which you have trained. But there are more difficult ones; for example, when you have imbalanced training data. Again, data is the part that determines
whether your undertaking will fail or succeed.

We see that only the fourth point is dealing with the fancy algorithms. Nevertheless,we hope that this book will convince you that the other four tasks are not simply chores, but can be equally important if not more exciting. Our hope is that by the end of the book you will have truly fallen in love with data instead of learned algorithms.To that end, we will not overwhelm you with the theoretical aspects of the diverse ML
algorithms, as there are already excellent books in that area (you will fnd pointers in
Appendix, Where to Learn More about Machine Learning). Instead, we will try to provide an intuition of the underlying approaches in the individual chapters—just enough for you to get the idea and be able to undertake your first steps. Hence, this book is by no means “the definitive guide” to machine learning. It is more a kind of starter kit. We hope that it ignites your curiosity enough to keep you eager in trying to learn more
and more about this interesting field.

In the rest of this chapter, we will set up and get to know the basic Python libraries,NumPy and SciPy, and then train our first machine learning using scikit-learn. During this endeavor, we will introduce basic ML concepts that will later be used throughout the book. The rest of the chapters will then go into more detail through the five steps described earlier, highlighting different aspects of machine learning in Python using
diverse application scenarios.

Machine learning and Python

Machine learning (ML)  teaches machines how to carry out tasks by themselves.It is that simple. The complexity comes with the details, and that is most likely the
reason you are reading this Machine learning and Python blog Series.
Maybe you have too much data and too little insight, and you hoped that using
machine learning algorithms will help you solve this challenge. So you started to
dig into random algorithms. But after some time you were puzzled: which of the
myriad of algorithms should you actually choose?
Or maybe you are broadly interested in machine learning and have been reading
a few blogs and articles about it for some time. Everything seemed to be magic and
cool, so you started your exploration and fed some toy data into a decision tree or
a support vector machine. But after you successfully applied it to some other data,
you wondered, was the whole setting right? Did you get the optimal results? And
how do you know there are no better algorithms? Or whether your data was “the
right one”?
Welcome to the club! We, the authors, were at those stages once upon a time,
looking for information that tells the real story behind the theoretical textbooks
on machine learning. It turned out that much of that information was “black art”,
not usually taught in standard textbooks. So, in a sense, we wrote this book to our
younger selves; a book that not only gives a quick introduction to machine learning,
but also teaches you lessons that we have learned along the way. We hope that it
will also give you, the reader, a smoother entry into one of the most exciting fields
in Computer Science.

Looping in Python

Single Statement Suites

If the suite of an if clause consists only of a single line, it may go on the same line as the header statement.

Here is an example of a one-line if clause −

Live Demo

#!/usr/bin/python

var = 100
if ( var == 100 ) : print "Value of expression is 100"
print "Good bye!"

When the above code is executed, it produces the following result −

Value of expression is 100
Good bye!

In general, statements are executed sequentially − The first statement in a function is executed first, followed by the second, and so on. There may be a situation when you need to execute a block of code several number of times.

Programming languages provide various control structures that allow more complicated execution paths.

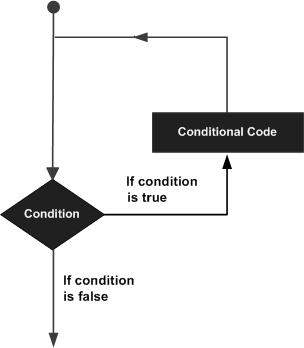
A loop statement allows us to execute a statement or group of statements multiple times. The following diagram illustrates a loop statement −

Loop Architecture

Python programming language provides the following types of loops to handle looping requirements.

S.No. Loop Type & Description
1 while loopRepeats a statement or group of statements while a given condition is TRUE. It tests the condition before executing the loop body.
2 for loopExecutes a sequence of statements multiple times and abbreviates the code that manages the loop variable.
3 nested loopsYou can use one or more loop inside any another while, or for loop.

Loop Control Statements

The Loop control statements change the execution from its normal sequence. When the execution leaves a scope, all automatic objects that were created in that scope are destroyed.

Python supports the following control statements.

S.No. Control Statement & Description
1 break statementTerminates the loop statement and transfers execution to the statement immediately following the loop.
2 continue statementCauses the loop to skip the remainder of its body and immediately retest its condition prior to reiterating.
3 pass statementThe pass statement in Python is used when a statement is required syntactically but you do not want any command or code to execute.

Let us go through the loop control statements briefly.

Iterator and Generator

Iterator is an object which allows a programmer to traverse through all the elements of a collection, regardless of its specific implementation. In Python, an iterator object implements two methods, iter() and next().

String, List or Tuple objects can be used to create an Iterator.

list = [1,2,3,4]
it = iter(list) # this builds an iterator object
print (next(it)) #prints next available element in iterator
Iterator object can be traversed using regular for statement
!usr/bin/python3
for x in it:
   print (x, end=" ")
or using next() function
while True:
   try:
      print (next(it))
   except StopIteration:
      sys.exit() #you have to import sys module for this

A generator is a function that produces or yields a sequence of values using yield method.

When a generator function is called, it returns a generator object without even beginning execution of the function. When the next() method is called for the first time, the function starts executing until it reaches the yield statement, which returns the yielded value. The yield keeps track i.e. remembers the last execution and the second next() call continues from previous value.

Example

The following example defines a generator, which generates an iterator for all the Fibonacci numbers.

!usr/bin/python3
import sys
def fibonacci(n): #generator function
   a, b, counter = 0, 1, 0
   while True:
      if (counter > n): 
         return
      yield a
      a, b = b, a + b
      counter += 1
f = fibonacci(5) #f is iterator object

while True:
   try:
      print (next(f), end=" ")
   except StopIteration:
      sys.exit()


Python Variable Declaration Rules and Syntax

Variable and Value

  • A variable is a memory location where a programmer can store a value. Example : roll_no, amount, name etc.
  • Value is either string, numeric etc. Example : “Sara”, 120, 25.36
  • Variables are created when first assigned.
  • Variables must be assigned before being referenced.
  • The value stored in a variable can be accessed or updated later.
  • No declaration required
  • The type (string, int, float etc.) of the variable is determined by Python
  • The interpreter allocates memory on the basis of the data type of a variable.

Python Variable Name Rules

  • Must begin with a letter (a – z, A – B) or underscore (_)
  • Other characters can be letters, numbers or _
  • Case Sensitive
  • Can be any (reasonable) length
  • There are some reserved words which you cannot use as a variable name because Python uses them for other things.

Good Variable Name

  • Choose meaningful name instead of short name. roll_no is better than rn.
  • Maintain the length of a variable name. Roll_no_of_a-student is too long?
  • Be consistent; roll_no or or RollNo
  • Begin a variable name with an underscore(_) character for a special case.

Variable assignment

We use the assignment operator (=) to assign values to a variable. Any type of value can be assigned to any valid variable.

a = 5
b = 3.2
c = "Hello"

Here, we have three assignment statements. 5 is an integer assigned to the variable a.

Similarly, 3.2 is a floating point number and "Hello" is a string (sequence of characters) assigned to the variables b and c respectively.

Multiple assignments

In Python, multiple assignments can be made in a single statement as follows:

a, b, c = 5, 3.2, "Hello"

If we want to assign the same value to multiple variables at once, we can do this as

x = y = z = "same"

This assigns the “same” string to all the three variables.

If  you have any further clarification on this topic please give comment bellow Python Variable Declaration Rules and Syntax

Python String Functions

In this below post we will go through the Python String Functions and their their uses. Strings operation and manipulation is very easy in the python . We can create them simply by enclosing characters in quotes. Python treats single quotes the same as double quotes. Creating strings is as simple as assigning a value to a variable. For example −

var1 = 'Hello World!'
var2 = "Python Programming"

Accessing Values in Strings

Python does not support a character type; these are treated as strings of length one, thus also considered a Substring.

To access substrings, use the square brackets for slicing along with the index or indices to obtain your substring. For example −

#!/usr/bin/python

var1 = 'Hello World!'
var2 = "Python Programming"

print "var1[0]: ", var1[0]
print "var2[1:5]: ", var2[1:5]

When the above code is executed, it produces the following result −

var1[0]:  H
var2[1:5]:  ytho

Updating Strings

You can “update” an existing string by (re)assigning a variable to another string. The new value can be related to its previous value or to a completely different string altogether. For example −

#!/usr/bin/python

var1 = 'Hello World!'

print "Updated String :- ", var1[:6] + 'Python'

When the above code is executed, it produces the following result −

Updated String :-  Hello Python

Escape Characters

Following table is a list of escape or non-printable characters that can be represented with backslash notation.

An escape character gets interpreted; in a single quoted as well as double quoted strings.

Backslash
notation
Hexadecimal
character
Description
\a 0x07 Bell or alert
\b 0x08 Backspace
\cx Control-x
\C-x Control-x
\e 0x1b Escape
\f 0x0c Formfeed
\M-\C-x Meta-Control-x
\n 0x0a Newline
\nnn Octal notation, where n is in the range 0.7
\r 0x0d Carriage return
\s 0x20 Space
\t 0x09 Tab
\v 0x0b Vertical tab
\x Character x
\xnn Hexadecimal notation, where n is in the range 0.9, a.f, or A.F

String Special Operators

Assume string variable a holds ‘Hello’ and variable b holds ‘Python’, then −

Operator Description Example
+ Concatenation – Adds values on either side of the operator a + b will give HelloPython
* Repetition – Creates new strings, concatenating multiple copies of the same string a*2 will give -HelloHello
[] Slice – Gives the character from the given index a[1] will give e
[ : ] Range Slice – Gives the characters from the given range a[1:4] will give ell
in Membership – Returns true if a character exists in the given string H in a will give 1
not in Membership – Returns true if a character does not exist in the given string M not in a will give 1
r/R Raw String – Suppresses actual meaning of Escape characters. The syntax for raw strings is exactly the same as for normal strings with the exception of the raw string operator, the letter “r,” which precedes the quotation marks. The “r” can be lowercase (r) or uppercase (R) and must be placed immediately preceding the first quote mark. print r’\n’ prints \n and print R’\n’prints \n
% Format – Performs String formatting See at next section

String Formatting Operator

One of Python’s coolest features is the string format operator %. This operator is unique to strings and makes up for the pack of having functions from C’s printf() family. Following is a simple example −

#!/usr/bin/python

print "My name is %s and weight is %d kg!" % ('Zara', 21) 

When the above code is executed, it produces the following result −

My name is Zara and weight is 21 kg!

Here is the list of complete set of symbols which can be used along with % −

Format Symbol Conversion
%c character
%s string conversion via str() prior to formatting
%i signed decimal integer
%d signed decimal integer
%u unsigned decimal integer
%o octal integer
%x hexadecimal integer (lowercase letters)
%X hexadecimal integer (UPPERcase letters)
%e exponential notation (with lowercase ‘e’)
%E exponential notation (with UPPERcase ‘E’)
%f floating point real number
%g the shorter of %f and %e
%G the shorter of %f and %E

Other supported symbols and functionality are listed in the following table −

Symbol Functionality
* argument specifies width or precision
left justification
+ display the sign
<sp> leave a blank space before a positive number
# add the octal leading zero ( ‘0’ ) or hexadecimal leading ‘0x’ or ‘0X’, depending on whether ‘x’ or ‘X’ were used.
0 pad from left with zeros (instead of spaces)
% ‘%%’ leaves you with a single literal ‘%’
(var) mapping variable (dictionary arguments)
m.n. m is the minimum total width and n is the number of digits to display after the decimal point (if appl.)

Triple Quotes

Python’s triple quotes comes to the rescue by allowing strings to span multiple lines, including verbatim NEWLINEs, TABs, and any other special characters.

The syntax for triple quotes consists of three consecutive single or doublequotes.

#!/usr/bin/python

para_str = """this is a long string that is made up of
several lines and non-printable characters such as
TAB ( \t ) and they will show up that way when displayed.
NEWLINEs within the string, whether explicitly given like
this within the brackets [ \n ], or just a NEWLINE within
the variable assignment will also show up.
"""
print para_str

When the above code is executed, it produces the following result. Note how every single special character has been converted to its printed form, right down to the last NEWLINE at the end of the string between the “up.” and closing triple quotes. Also note that NEWLINEs occur either with an explicit carriage return at the end of a line or its escape code (\n) −

this is a long string that is made up of
several lines and non-printable characters such as
TAB (    ) and they will show up that way when displayed.
NEWLINEs within the string, whether explicitly given like
this within the brackets [
 ], or just a NEWLINE within
the variable assignment will also show up.

Raw strings do not treat the backslash as a special character at all. Every character you put into a raw string stays the way you wrote it −

#!/usr/bin/python

print 'C:\\nowhere'

When the above code is executed, it produces the following result −

C:\nowhere

Now let’s make use of raw string. We would put expression in r’expression’ as follows −

#!/usr/bin/python

print r'C:\\nowhere'

When the above code is executed, it produces the following result −

C:\\nowhere

Unicode String

Normal strings in Python are stored internally as 8-bit ASCII, while Unicode strings are stored as 16-bit Unicode. This allows for a more varied set of characters, including special characters from most languages in the world. I’ll restrict my treatment of Unicode strings to the following −

#!/usr/bin/python

print u'Hello, world!'

When the above code is executed, it produces the following result −

Hello, world!

As you can see, Unicode strings use the prefix u, just as raw strings use the prefix r.

Built-in String Methods

Python includes the following built-in methods to manipulate strings −

SN Methods with Description
1 capitalize()
Capitalizes first letter of string
2 center(width, fillchar)

Returns a space-padded string with the original string centered to a total of width columns.

3 count(str, beg= 0,end=len(string))

Counts how many times str occurs in string or in a substring of string if starting index beg and ending index end are given.

4 decode(encoding=’UTF-8′,errors=’strict’)

Decodes the string using the codec registered for encoding. encoding defaults to the default string encoding.

5 encode(encoding=’UTF-8′,errors=’strict’)

Returns encoded string version of string; on error, default is to raise a ValueError unless errors is given with ‘ignore’ or ‘replace’.

6 endswith(suffix, beg=0, end=len(string))
Determines if string or a substring of string (if starting index beg and ending index end are given) ends with suffix; returns true if so and false otherwise.
7 expandtabs(tabsize=8)

Expands tabs in string to multiple spaces; defaults to 8 spaces per tab if tabsize not provided.

8 find(str, beg=0 end=len(string))

Determine if str occurs in string or in a substring of string if starting index beg and ending index end are given returns index if found and -1 otherwise.

9 index(str, beg=0, end=len(string))

Same as find(), but raises an exception if str not found.

10 isalnum()

Returns true if string has at least 1 character and all characters are alphanumeric and false otherwise.

11 isalpha()

Returns true if string has at least 1 character and all characters are alphabetic and false otherwise.

12 isdigit()

Returns true if string contains only digits and false otherwise.

13 islower()

Returns true if string has at least 1 cased character and all cased characters are in lowercase and false otherwise.

14 isnumeric()

Returns true if a unicode string contains only numeric characters and false otherwise.

15 isspace()

Returns true if string contains only whitespace characters and false otherwise.

16 istitle()

Returns true if string is properly “titlecased” and false otherwise.

17 isupper()

Returns true if string has at least one cased character and all cased characters are in uppercase and false otherwise.

18 join(seq)

Merges (concatenates) the string representations of elements in sequence seq into a string, with separator string.

19 len(string)

Returns the length of the string

20 ljust(width[, fillchar])

Returns a space-padded string with the original string left-justified to a total of width columns.

21 lower()

Converts all uppercase letters in string to lowercase.

22 lstrip()

Removes all leading whitespace in string.

23 maketrans()

Returns a translation table to be used in translate function.

24 max(str)

Returns the max alphabetical character from the string str.

25 min(str)

Returns the min alphabetical character from the string str.

26 replace(old, new [, max])

Replaces all occurrences of old in string with new or at most max occurrences if max given.

27 rfind(str, beg=0,end=len(string))

Same as find(), but search backwards in string.

28 rindex( str, beg=0, end=len(string))

Same as index(), but search backwards in string.

29 rjust(width,[, fillchar])

Returns a space-padded string with the original string right-justified to a total of width columns.

30 rstrip()

Removes all trailing whitespace of string.

31 split(str=””, num=string.count(str))

Splits string according to delimiter str (space if not provided) and returns list of substrings; split into at most num substrings if given.

32 splitlines( num=string.count(‘\n’))

Splits string at all (or num) NEWLINEs and returns a list of each line with NEWLINEs removed.

33 startswith(str, beg=0,end=len(string))

Determines if string or a substring of string (if starting index beg and ending index end are given) starts with substring str; returns true if so and false otherwise.

34 strip([chars])

Performs both lstrip() and rstrip() on string

35 swapcase()

Inverts case for all letters in string.

36 title()

Returns “titlecased” version of string, that is, all words begin with uppercase and the rest are lowercase.

37 translate(table, deletechars=””)

Translates string according to translation table str(256 chars), removing those in the del string.

38 upper()

Converts lowercase letters in string to uppercase.

39 zfill (width)

Returns original string leftpadded with zeros to a total of width characters; intended for numbers, zfill() retains any sign given (less one zero).

40 isdecimal()

Returns true if a unicode string contains only decimal characters and false otherwise.

VBScript in Internet Explorer

VBScript in Internet Explorer
Here are simple steps to turn on or turn off VBScript in your Internet Explorer:
 Follow Tools -> Internet Options from the menu
 Select Security tab from the dialog box
 Click the Custom Level button
 Scroll down till you find Scripting option
 Select Enable radio button under Active scripting
 Finally click OK and come out
To disable VBScript support in your Internet Explorer, you need to select Disable radio button under Active scripting.
3. VBScript– Enabling in Browsers
VBScript
15
VBScript Placement in HTML File
There is a flexibility given to include VBScript code anywhere in an HTML document. But the most preferred way to include VBScript in your HTML file is as follows:
 Script in <head>…</head> section.
 Script in <body>…</body> section.
 Script in <body>…</body> and <head>…</head> sections.
 Script in an external file and then include in <head>…</head> section.
In the following section, we will see how we can put VBScript in different ways:
VBScript in <head>…</head> section
If you want to have a script run on some event, such as when a user clicks somewhere, then you will place that script in the head as follows:
<html>
<head>
<script type=”text/Vbscript”>
<!–
Function sayHello()
Msgbox(“Hello World”)
End Function
//–>
</script>
</head>
<body>
<input type=”button” onclick=”sayHello()” value=”Say Hello” />
</body>
</html> 4. VBScript– Placements
VBScript
16
It will produce the following result: A button with the name SayHello. Upon clicking on the Button, the message box is displayed to the user with the message “Hello World”.
VBScript in <body>…</body> section
If you need a script to run as the page loads so that the script generates content in the page, the script goes in the <body> portion of the document. In this case, you would not have any function defined using VBScript:
<html>
<head>
</head>
<body>
<script type=”text/vbscript”>
<!–
document.write(“Hello World”)
//–>
</script>
<p>This is web page body </p>
</body>
</html>
It will produce the following result:
Hello World
This is web page body
VBScript in <body> and <head> Sections
You can put your VBScript code in <head> and <body> section altogether as follows:
<html>
<head>
<script type=”text/vbscript”>
<!–
Function sayHello()
VBScript
17
msgbox(“Hello World”)
End Function
//–>
</script>
</head>
<body>
<script type=”text/vbscript”>
<!–
document.write(“Hello World”)
//–>
</script>
<input type=”button” onclick=”sayHello()” value=”Say Hello” />
</body>
</html>
It will produce the following result: Hello World message with a ‘Say Hello’ button. Upon Clicking on the button a message box with a message “Hello World” is displayed to the user.
VBScript in External File
As you begin to work more extensively with VBScript, you will likely find that there are cases, where you are reusing identical VBScript code on multiple pages of a site. You are not restricted to be maintaining identical code in multiple HTML files.
The script tag provides a mechanism to allow you to store VBScript in an external file and then include it into your HTML files. Here is an example to show how you can include an external VBScript file in your HTML code using script tag and its src attribute:
<html>
<head>
<script type=”text/vbscript” src=”filename.vbs” ></script>
</head>
<body>
…….
</body>
VBScript
18
</html>
To use VBScript from an external file source, you need to write your all VBScript source code in a simple text file with extension “.vbs” and then include that file as shown above. For example, you can keep the following content in filename.vbs file and then you can use sayHello function in your HTML file after including filename.vbs file.
Function sayHello()
Msgbox “Hello World”
End Function

VB Script Syntax Basic

YourFirstVBScript
Let us write a VBScript to print out “Hello World”.
<html>
<body>
<script language=”vbscript” type=”text/vbscript”>
document.write(“Hello World!”)
</script>
</body>
</html>
In the above example, we called a function document.write, which writes a string into the
HTML document. This function can be used to write text, HTML, or both. So, the above code
will display the following result:
Hello World!
WhitespaceandLineBreaks
VBScript ignores spaces, tabs, and newlines that appear within VBScript programs. One can
use spaces, tabs, and newlines freely within the program, so you are free to format and indent
your programs in a neat and consistent way that makes the code easy to read and understand.
Formatting
VBScript is based on Microsoft’s Visual Basic. Unlike JavaScript, no statement terminators
such as semicolon is used to terminate a particular statement.
Single Line Syntax
Colons are used when two or more lines of VBScript ought to be written in a single line. Hence,
in VBScript, Colons act as a line separator.
<script language=”vbscript” type=”text/vbscript”>
var1 = 10 : var2 = 20

</script>
Multiple Line Syntax
When a statement in VBScript is lengthy and if user wishes to break it into multiple lines, then
the user has to use underscore “_”. This improves the readability of the code. The following
example illustrates how to work with multiple lines.
<script language=”vbscript” type=”text/vbscript”>
var1 = 10
var2 = 20
Sum = var1 + var2
document.write(“The Sum of two numbers”&_
“var1 and var2 is ” & Sum)
</script>
ReservedWords
The following list shows the reserved words in VBScript. These reserved words SHOULD NOT
be used as a constant or variable or any other identifier names.

Loop LSet Me
Mod New Next
Not Nothing Null
On Option Optional
Or ParamArray Preserve
Private Public RaiseEvent
ReDim Rem Resume
RSet Select Set
Shared Single Static
Stop Sub Then
To True Type
And As Boolean
ByRef Byte ByVal
Call Case Class
Const Currency Debug
Dim Do Double
Each Else ElseIf
Empty End EndIf
Enum Eqv Event
Exit False For
Function Get GoTo
If Imp Implements
In Integer Is
Let Like Long
TypeOf Until Variant
Wend While With
Shared Single Static
Stop Sub Then
To True Type
And As Boolean
ByRef Byte ByVal
Call Case Class
Const Currency Debug
Dim Do Double
Each Else ElseIf
Empty End EndIf
Enum Eqv Event
Exit False For
Function Get GoTo
If Imp Implements
In Integer Is
Let Like Long
TypeOf Until Variant
Wend While With
Xor Eval Execute
Msgbox Erase ExecuteGlobal
Option Explicit Randomize SendKeys

CaseSensitivity
VBScript is a case-insensitive language. This means that language keywords, variables,
function names and any other identifiers need NOT be typed with a consistent capitalization
of letters. So identifiers int_counter, INT_Counter and INT_COUNTER have the same meaning
within VBScript.
CommentsinVBScript
Comments are used to document the program logic and the user information with which other
programmers can seamlessly work on the same code in future. It can include information
such as developed by, modified by and it can also include incorporated logic. Comments are
ignored by the interpreter while execution. Comments in VBScript are denoted by two
methods.
Any statement that starts with a Single Quote (‘) is treated as comment. Following is the
example:
<script language=”vbscript” type=”text/vbscript”>
<!—
‘ This Script is invoked after successful login
‘ Written by : TutorialsPoint
‘ Return Value : True / False
//- >
</script>
Any statement that starts with the keyword “REM”. Following is the example:
<script language=”vbscript” type=”text/vbscript”>
<!—
REM This Script is written to Validate the Entered Input

REM Modified by
//- > </script>
: Tutorials point/user2

Not all the modern browsers support VBScript. VBScript is supported just by Microsoft’s
Internet Explorer while other browsers (Firefox and Chrome) support just JavaScript. Hence,
developers normally prefer JavaScript over VBScript.
Though Internet Explorer (IE) supports VBScript, you may need to enable or disable this
feature manually. This tutorial will make you aware of the procedure of enabling and disabling
VBScript support in Internet Explorer.

Features of VBScript

In this post, we will outline the features of VBScript, which stands for Visual Basic Scripting and is a subset of Visual Basic for Applications (VBA), a Microsoft product integrated not only into Microsoft software like MS Project and MS Office but also into third-party tools like AUTO CAD.

**Features of VBScript:**

1. **Lightweight:** VBScript is a lightweight scripting language with a rapid interpreter.

2. **Case Insensitive:** VBScript is predominantly case insensitive, featuring a straightforward syntax that is easy to learn and implement.

3. **Object-Based:** Unlike languages like C++ or Java, VBScript is an object-based scripting language, not an Object-Oriented Programming language.

4. **COM Usage:** It utilizes the Component Object Model (COM) to access elements within the execution environment.

5. **Host Environment:** VBScript requires a host environment for successful execution, such as Internet Explorer (IE), Internet Information Services (IIS), and Windows Scripting Host (WSH).

**VBScript Version History and Uses:**

VBScript was introduced by Microsoft in 1996 with its first version, 1.0. The current stable version is 5.8, available with IE8 and Windows 7. VBScript has a wide range of applications, including:

1. **Automation Testing:** It is used in popular automation testing tools like Quick Test Professional (QTP).

2. **Windows Automation:** Windows System administrators use VBScript within Windows Scripting Host to automate Windows Desktop tasks.

3. **Web Development:** Active Server Pages (ASP), a server-side scripting environment for dynamic webpages, employs VBScript or JavaScript.

4. **Client-Side Scripting:** VBScript is used for client-side scripting in Microsoft Internet Explorer.

5. **Microsoft Outlook Forms:** VBScript is commonly used in Microsoft Outlook Forms, with application-level programming relying on VBA in Outlook 2000 onwards.

**Disadvantages:**

1. **Browser Compatibility:** VBScript is only supported by Internet Explorer, as other browsers like Chrome and Firefox do not support it. JavaScript is often preferred for broader compatibility.

2. **Limited Command Line Support:** VBScript has limited command line support.

3. **Debugging Challenges:** The absence of a default development environment makes debugging in VBScript more challenging.

**Current Status of VBScript:**

The current version of VBScript is 5.8. With the development of the .NET framework, Microsoft has chosen to support VBScript within ASP.NET for web development. As a result, there won’t be any new versions of the VBScript engine, but Microsoft’s Sustaining Engineering Team is addressing defect fixes and security issues. VBScript will continue to be shipped as part of all Microsoft Windows and IIS installations by default.

History of Python Comedy, Snake or Programming Language

History of Python

Easy as ABC

Origin of the name Monty Python What do the alphabet and the programming language Python have in common? Right, both start with ABC. If we are talking about ABC in the Python context, it’s clear that the programming language ABC is meant. ABC is a general-purpose programming language and programming environment, which had been developed in the Netherlands, Amsterdam, at the CWI (Centrum Wiskunde & Informatica). The greatest achievement of ABC was to influence the design of Python.

Python was conceptualized in the late 1980s. Guido van Rossum worked that time in a project at the CWI, called Amoeba, a distributed operating system. In an interview with Bill Venners1, Guido van Rossum said: “In the early 1980s, I worked as an implementer on a team building a language called ABC at Centrum voor Wiskunde en Informatica (CWI). I don’t know how well people know ABC’s influence on Python. I try to mention ABC’s influence because I’m indebted to everything I learned during that project and to the people who worked on it.”

Later on in the same Interview, Guido van Rossum continued: “I remembered all my experience and some of my frustration with ABC. I decided to try to design a simple scripting language that possessed some of ABC’s better properties, but without its problems. So I started typing. I created a simple virtual machine, a simple parser, and a simple runtime. I made my own version of the various ABC parts that I liked. I created a basic syntax, used indentation for statement grouping instead of curly braces or begin-end blocks, and developed a small number of powerful data types: a hash table (or dictionary, as we call it), a list, strings, and numbers.”

Comedy, Snake or Programming Language

So, what about the name “Python”: Most people think about snakes, and even the logo depicts two snakes, but the origin of the name has its root in British humour. Guido van Rossum, the creator of Python, wrote in 1996 about the origin of the name of his programming language1: “Over six years ago, in December 1989, I was looking for a ‘hobby’ programming project that would keep me occupied during the week around Christmas. My office … would be closed, but I had a home computer, and not much else on my hands. I decided to write an interpreter for the new scripting language I had been thinking about lately: a descendant of ABC that would appeal to Unix/C hackers. I chose Python as a working title for the project, being in a slightly irreverent mood (and a big fan of Monty Python’s Flying Circus).”

The Zen of Python

  • Beautiful is better than ugly.
  • Explicit is better than implicit.
  • Simple is better than complex.
  • Complex is better than complicated.
  • Flat is better than nested.
  • Sparse is better than dense.
  • Readability counts.
  • Special cases aren’t special enough to break the rules.
  • Although practicality beats purity.
  • Errors should never pass silently.
  • Unless explicitly silenced.
  • In the face of ambiguity, refuse the temptation to guess.
  • There should be one — and preferably only one — obvious way to do it.
  • Although that way may not be obvious at first unless you’re Dutch.
  • Now is better than never.
  • Although never is often better than *right* now.
  • If the implementation is hard to explain, it’s a bad idea.
  • If the implementation is easy to explain, it may be a good idea.
  • Namespaces are one honking great idea — let’s do more of those!


Development Steps of Python

Guido Van Rossum published the first version of Python code (version 0.9.0) at alt.sources in February 1991. This release included already exception handling, functions, and the core data types of list, dict, str and others. It was also object oriented and had a module system.

Python version 1.0 was released in January 1994. The major new features included in this release were the functional programming tools lambda, map, filter and reduce, which Guido Van Rossum never liked.

Six and a half years later in October 2000, Python 2.0 was introduced. This release included list comprehensions, a full garbage collector and it was supporting unicode.

Python flourished for another 8 years in the versions 2.x before the next major release as Python 3.0 (also known as “Python 3000” and “Py3K”) was released. Python 3 is not backwards compatible with Python 2.x. The emphasis in Python 3 had been on the removal of duplicate programming constructs and modules, thus fulfilling or coming close to fulfilling the 13th law of the Zen of Python: “There should be one — and preferably only one — obvious way to do it.”

Some changes in Python 3.0:

  • Print is now a function
  • Views and iterators instead of lists
  • The rules for ordering comparisons have been simplified. E.g. a heterogeneous list cannot be sorted, because all the elements of a list must be comparable to each other.
  • There is only one integer type left, i.e. int. long is int as well.
  • The division of two integers returns a float instead of an integer. “//” can be used to have the “old” behaviour.
  • Text Vs. Data Instead Of Unicode Vs. 8-bit

For more on Python 2 & 3 please visit the post Difference between Python 2 and 3