Java Script Variables

Understanding JavaScript Variables: A Beginner’s Guide

JavaScript is the language of the web, providing interactivity and dynamic functionality to websites worldwide. One of the fundamental aspects of JavaScript programming is working with variables. Whether you’re new to coding or looking to refresh your knowledge, understanding variables in JavaScript is essential for writing effective and efficient code.

What are Variables?

In simple terms, a variable is a named container for storing data values. These values can vary (hence the name “variable”) as the program runs. Variables allow developers to manipulate data, perform operations, and create dynamic applications. Before we delve into how to use variables, let’s explore the different types.

Types of Variables in JavaScript

JavaScript variables can be broadly categorized into three types based on how they are declared: var, let, and const.

  • var: Historically used for variable declaration in JavaScript, var has some quirks that let and const were introduced to address. Variables declared with var are function-scoped or globally scoped, which means they are visible throughout the function they are declared in (if declared inside a function) or visible globally (if declared outside any function).
  • let: Introduced in ES6 (ECMAScript 2015), let allows block-scoping, which means the variable is only accessible within the block it’s defined in. Block-scoping helps prevent unintended variable hoisting and makes code more predictable.
  • const: Also introduced in ES6, const is used to declare variables whose values should not be reassigned. It’s important to note that while the value of a const variable cannot be changed, if the value is an object or an array, the properties or elements of that object or array can still be modified.

Declaring Variables

Let’s look at how each type of variable is declared:

  • Using var:
  var greeting = "Hello, World!";
  • Using let:
  let count = 0;
  • Using const:
  const PI = 3.14159;

Rules for Naming Variables

  • Variable names must begin with a letter, dollar sign $, or an underscore _. They cannot begin with a number.
  • Subsequent characters can be letters, numbers, underscores, or dollar signs.
  • Variable names are case-sensitive (myVar is different from myvar).
  • Avoid using JavaScript reserved words like let, const, var, function, etc., as variable names.

Assigning Values

Once a variable is declared, you can assign values to it. Here’s how:

let name = "Alice";
let age = 30;
let isStudent = true;

Reassigning Variables

Variables declared with var and let can have their values reassigned:

let score = 85;
score = 90; // Reassigned score to 90

Using Variables

Variables can be used in various ways within your JavaScript code:

  • Printing to Console:
  let message = "Hello, World!";
  console.log(message); // Outputs: Hello, World!
  • Performing Operations:
  let num1 = 10;
  let num2 = 5;
  let sum = num1 + num2;
  console.log(sum); // Outputs: 15
  • Concatenation (for strings):
  let firstName = "John";
  let lastName = "Doe";
  let fullName = firstName + " " + lastName;
  console.log(fullName); // Outputs: John Doe

Scope of Variables

Understanding variable scope is crucial for writing bug-free and maintainable code. Scope refers to the visibility and accessibility of variables within different parts of your code.

  • Global Scope: Variables declared outside of any function or block have global scope and can be accessed anywhere in the script.
  • Local Scope: Variables declared inside a function have local scope and are only accessible within that function.
  • Block Scope: Variables declared with let and const have block scope, meaning they are only accessible within the block (enclosed by {}) in which they are defined.

Best Practices

  • Use const for variables that should not be reassigned.
  • Use let for variables that will be reassigned.
  • Always declare variables before using them.
  • Choose descriptive variable names for clarity.
  • Be mindful of variable scope to avoid unexpected behavior.

Conclusion

Variables are the building blocks of JavaScript programming, allowing developers to store and manipulate data dynamically. By understanding the different types of variables, how to declare and use them, and their scope, you’re equipped to write cleaner, more efficient code. Whether you’re creating a simple webpage or a complex web application, mastering variables is a foundational step towards becoming a proficient JavaScript developer.
The Structure of a C Program

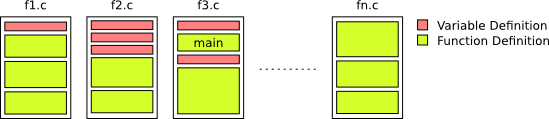
A C program is a set of functions, data type definitions, and variable declarations contained in a set of files. A C program always starts its execution by the function with the name main. Any function can invoke any other function and the variables declared outside the function are either global or local to the current file (if they are declared with the prefix). The following figure shows the structure of a C program contained in several files.

The C compiler is the program that translates a set of functions, definitions and declarations in multiple files into an executable file. The C compiler has a surprisingly simple behavior and performs much less work than expected when compared with others such as the Java compiler. To create an executable, the compiler processes the source files one by one independently. This means that the defined variables and functions are not remembered when processing another file. Furthermore, the compiler performs a single pass over the text, only those definitions up to the current compilation point are visible.

As a consequence of this behavior, a variable cannot be used unless it has been previously declared in the same file. Analogously, a function cannot be invoked unless its code has been previously included in the same file. To allow the division of code in multiple files the language allows the definition of “function prototypes” (the type of the result followed by the function name and the parameter types in parenthesis) without including the code, and also the definition of variables as “external”, that is, present in a different file. It follows an example of two files in which function fill_in and variable table are defined in one file but used inside in the main function.

File1.cFile2.c
1 2 3 4 5 6 7 8 9 10 11 12 13 14 #define SIZE 100 /* Array of 100 integers (Global)*/ int table[SIZE]; /* Fills an array with zeros */ void fill_in(int *t, int size) { int i; for (i = 0; i < size; i++) { t[i] = 0; } return; }1 2 3 4 5 6 7 8 9 10 11 12 #define SIZE 100 /* Global variable declared in other file */ extern int table[SIZE]; /* Function declared in other file */ void fill_in(int *, int); /* Program entry point */ int main(int argc, char *argv[]) { fill_in(table, SIZE); return 0; }

Line 3 in File2.c notifies the compiler that there exist an array of 100 integers with name table defined in another file. Line 6 is a function prototype. It contains the result type (void) followed by the function name (fill_in) and the type and name of the parameters in parenthesis (int *t, int size). This line informs the compiler that a function with this definition is in a different location in the program. Thanks to these definitions, Line 11 is correct. The function fill_in can be invoked, and the variable table is known.

Line 1 of both files (#define) corresponds to a preprocessor directive, which tells the preprocessor to replace every occurrence of a particular character string (in this case, SIZE) with a specified value (in this case, 100). The C preprocessor runs before the compiler and is in charge of these replacements. Use the #define directive when you have to define constants in your program, especially for size arrays. Write these constants in upper case always, in order to be easily readable.

The C Language and its Advantages

C, the oldest of the programming languages still in use today, is also one of the most powerful. C was originally designed as a system implementation language within Bell Labs and has since become one of the most popular programming languages in existence. It’s been used for developing operating systems, compilers, debuggers, and many other applications that involve low-level computer hardware interaction.

Here are 10 advantages to using C as your primary programming language,

Powerful and efficient language

C has been called a “portable assembler” and is used for low-level programming that can be compiled with different compilers. C’s efficiency makes it easy to write efficient code, which in turn improves runtime performance. Its versatility enables programmers to take advantage of many libraries like OpenCV (computer vision), SQLite (database management system), and GTK+ (windowing toolkit).

The fact that the language originated as an implementation language also gives these advantages: it was designed by experts who had experience writing programs on their own machines; because there are no pointers or other abstract concepts involved, you don’t have to worry about ever getting memory allocation wrong; and lastly, its simplicity leaves room for optimization opportunities.

Portable language

C is a portable language. It was designed to be compiled with different compilers and can run on most hardware platforms, which means you don’t have to know everything about the memory layout of your machine in order to write programs for it.

The C programming language also enables programmers to recompile their code without having any knowledge of assembly.

Built-in functions

C has many built-in functions that make it easier for programmers to write programs. Functions like scanf() and printf() can be called without declaring them first because they are automatically linked in by the compiler. A variety of libraries exist which provide an even greater selection of these types of function calls, enabling you to focus on your own.

Quality to extend itself

C is eminently extensible. The language has been extended by several different languages, including Java and Objective-C. It’s also possible to extend C in the same way with preprocessors like GCC or Clang which can generate code from a file that will take care of things for you automatically.

Open-source

The C programming language is open-source, which means that the code is publicly available and each programmer can modify it to suit their needs. This also enables programmers to create libraries for public use based on particular preferences or problems they want to be solved.

C’s simple design leaves room for optimization opportunities: every detail of structured programming language.

Structured programming language

C is a structured programming language, which means that it has an opening and closing brace for every block of code. The programmer can use the extra space provided by these braces to indent their code within each function, making everything easier to read.

Middle-level language

C is a middle-level programming language, which means it can be used for low- or high-level programming. It’s an excellent choice because of its efficiency and portability.

Implementation of algorithms and data structures

C is an excellent choice for implementing algorithms and data structures. Though it may seem like a low-level language, C has been used to create some of the most widely-used software in existence: operating systems, compilers, debuggers, etc.

Procedural programming language

C is a procedural programming language, which means that it provides instructions to the computer in order. It’s called “procedural” because of its use of procedures and functions for tasks like input/output. C also supports object-oriented programming through inheritance, polymorphism, and encapsulation; this enables programmers to create reusable code.

Dynamic memory allocation

C supports dynamic memory allocation, which means that a programmer can create and destroy sections of memory as needed. This is an essential aspect of modern programming languages because it’s impossible to know in advance how much space one will need.

Conclusion

The C programming language is a great option for anyone wanting to write their own programs. It’s not limited by the hardware or operating system it runs on, and the simplicity of its features leaves room for optimization opportunities and extensions.

Python + Selenium | Downloading Python bindings for Selenium

1. Installation

1.1. Introduction

To run the Selenium in a machine we need to install the library and necessary tools/bindings to play with Selenium.

Selenium Python bindings provides a simple API to write functional/acceptance tests using Selenium WebDriver. Through Selenium Python API you can access all functionalities of Selenium WebDriver in an intuitive way.

Selenium Python bindings provide a convenient API to access Selenium WebDrivers like Firefox, Ie, Chrome, Remote etc. The current supported Python versions are 3.5 and above.

This documentation explains Selenium 2 WebDriver API. Selenium 1 / Selenium RC API is not covered here.

1.2. Installing Python bindings for Selenium

pip is a package install for python we will use pip to install necessary bindings for Selenium.
If you have pip not installed in the system you can follow this link to install pip in the system pip.

Python 3 has pip available in the standard library. Using pip, you can install selenium like this:

pip install selenium

You may consider using virtualenv to create isolated Python environments. Python 3 has venv which is almost the same as virtualenv.

You can also download Python bindings for Selenium from the PyPI page for selenium package. and install manually.

1.3. Instructions for Windows users

  1. Install Python 3 using the MSI available in python.org download page.
  2. Start a command prompt using the cmd.exe program and run the pip command as given below to install selenium.C:\Python39\Scripts\pip.exe install selenium

Now you can run your test scripts using Python. For example, if you have created a Selenium based script and saved it inside C:\my_selenium_script.py, you can run it like this:

C:\Python39\python.exe C:\my_selenium_script.py

1.4. Installing from Git sources

To build Selenium Python from the source code, clone the official repository. It contains the source code for all official Selenium flavors, like Python, Java, Ruby and others. The Python code resides in the /py directory. To build, you will also need the Bazel build system.

Note

Currently, as Selenium gets near to the 4.0.0 release, it requires Bazel 3.2.0 (Install instructions), even though 3.3.0 is already available.

To build a Wheel from the sources, run the following command from the repository root:

bazel //py:selenium-wheel

This command will prepare the source code with some preprocessed JS files needed by some webdriver modules and build the .whl package inside the ./bazel-bin/py/ directory. Afterwards, you can use pip to install it.

1.5. Web Drivers

Selenium requires a driver to interface with the chosen browser. Firefox, for example, requires geckodriver, which needs to be installed before the below examples can be run. Make sure it’s in your PATH, e. g., place it in /usr/bin or /usr/local/bin.

Failure to observe this step will give you an error selenium.common.exceptions.WebDriverException: Message: ‘geckodriver’ executable needs to be in PATH.

Other supported browsers will have their own drivers available. Links to some of the more popular browser drivers follow.

Chrome:https://sites.google.com/a/chromium.org/chromedriver/downloads
Edge:https://developer.microsoft.com/en-us/microsoft-edge/tools/webdriver/
Firefox:https://github.com/mozilla/geckodriver/releases
Safari:https://webkit.org/blog/6900/webdriver-support-in-safari-10/

For more information about driver installation, please refer the official documentation.

1.6. Downloading Selenium server

Note

The Selenium server is only required if you want to use the remote WebDriver. See the Using Selenium with remote WebDriver section for more details. If you are a beginner learning Selenium, you can skip this section and proceed with next chapter.

Selenium server is a Java program. Java Runtime Environment (JRE) 1.6 or newer version is recommended to run Selenium server.

You can download Selenium server 2.x from the download page of selenium website. The file name should be something like this: selenium-server-standalone-2.x.x.jar. You can always download the latest 2.x version of Selenium server.

If Java Runtime Environment (JRE) is not installed in your system, you can download the JRE from the Oracle website. If you are using a GNU/Linux system and have root access in your system, you can also use your operating system instructions to install JRE.

If java command is available in the PATH (environment variable), you can start the Selenium server using this command:

java -jar selenium-server-standalone-2.x.x.jar

Replace 2.x.x with the actual version of Selenium server you downloaded from the site.

If JRE is installed as a non-root user and/or if it is not available in the PATH (environment variable), you can type the relative or absolute path to the java command. Similarly, you can provide a relative or absolute path to Selenium server jar file. Then, the command will look something like this:

/path/to/java -jar /path/to/selenium-server-standalone-2.x.x.jar

Selenium Web Driver

Selenium WebDriver is an automated testing framework used for the validation of websites (and web applications). It supports popular programming languages such as Python, C#, Java, Ruby, Java Script and more.

Selenium WebDriver was introduced in Selenium v2. As Selenium WebDriver communicates with a web browser using its corresponding browser driver, it does not require a component like Selenium RC Server (as in Selenium RC).

Selenium WebDriver for popular browsers can be downloaded from the links mentioned below:

BROWSERDOWNLOAD LOCATION
Firefoxhttps://github.com/mozilla/geckodriver/releases
Chromehttp://chromedriver.chromium.org/downloads
Internet Explorerhttps://github.com/SeleniumHQ/selenium/wiki/InternetExplorerDriver
Microsoft Edgehttps://developer.microsoft.com/en-us/microsoft-edge/tools/webdriver/

In further sections of this Selenium WebDriver tutorial, we would look at using Selenium WebDriver with Python framework such as PyTest.

Java Script Code structure

Mastering JavaScript Code Structure: A Comprehensive Guide

JavaScript, the language of the web, is renowned for its flexibility and versatility. Understanding the foundational elements of JavaScript code structure is essential for every developer, whether you’re just starting or looking to enhance your skills. In this blog, we’ll delve into the core components of JavaScript code structure, from statements and expressions to functions and control flow.

Anatomy of JavaScript Code

JavaScript code is composed of various elements that work together to create functional and interactive web applications. Let’s explore the key components:

1. Statements

JavaScript statements are the building blocks of code, each performing an action. A statement can be an assignment, a function call, a loop, or a conditional statement.

// Example of statements
let greeting = "Hello, World!"; // Variable assignment statement
console.log(greeting); // Function call statement
if (greeting === "Hello, World!") { // Conditional statement
    console.log("It's a match!");
}
2. Comments

Comments in JavaScript are used to add explanatory notes within the code. They are ignored by the JavaScript engine when the code is executed.

// Single-line comment
/* Multi-line
   comment */

Comments are invaluable for documenting code, explaining complex logic, and making it more readable for yourself and others.

3. Variables and Constants

Variables and constants are used to store and manipulate data within a program. They must be declared before use.

let userName = "John"; // Variable declaration (can be reassigned)
const PI = 3.14159; // Constant declaration (cannot be reassigned)
4. Data Types

JavaScript has several primitive data types, including numbers, strings, booleans, null, undefined, and symbols. Objects and arrays are also considered data types.

let age = 30; // Number
let name = "Alice"; // String
let isStudent = true; // Boolean
let car = null; // Null
let pet; // Undefined
let symbols = Symbol("unique"); // Symbol
let person = { name: "Bob", age: 25 }; // Object
let fruits = ["apple", "banana", "orange"]; // Array
5. Operators

Operators are used to perform operations on variables and values. JavaScript includes arithmetic, assignment, comparison, logical, and other types of operators.

let x = 10;
let y = 5;
let sum = x + y; // Addition
let product = x * y; // Multiplication
let isEqual = x === y; // Strict equality comparison
let isGreater = x > y; // Greater than comparison
let logicalAnd = (x > 0) && (y > 0); // Logical AND
6. Functions

Functions are reusable blocks of code that perform a specific task. They can accept parameters and return values.

function greet(name) {
    return "Hello, " + name + "!";
}

let greetingMessage = greet("Alice"); // Function call
console.log(greetingMessage); // Output: Hello, Alice!
7. Control Flow

Control flow statements, such as if-else, switch, for loops, while loops, and do-while loops, determine the flow of execution in a program.

let hour = 12;
let greeting;

if (hour < 12) {
    greeting = "Good morning!";
} else if (hour < 18) {
    greeting = "Good afternoon!";
} else {
    greeting = "Good evening!";
}

console.log(greeting); // Output depends on the value of 'hour'
8. Objects and Classes

JavaScript is an object-oriented language, allowing you to create objects and classes for organizing and reusing code.

// Object
let person = {
    firstName: "John",
    lastName: "Doe",
    fullName: function() {
        return this.firstName + " " + this.lastName;
    }
};

console.log(person.fullName()); // Output: John Doe

// Class
class Car {
    constructor(brand) {
        this.carBrand = brand;
    }

    displayBrand() {
        console.log("Brand: " + this.carBrand);
    }
}

let myCar = new Car("Toyota");
myCar.displayBrand(); // Output: Brand: Toyota

Best Practices

  • Use meaningful variable names for clarity and readability.
  • Follow consistent indentation and formatting practices.
  • Use comments to explain complex logic or document the purpose of functions and blocks of code.
  • Organize your code logically into functions and classes for reusability.
  • Practice modularization to break down large programs into smaller, manageable pieces.

Conclusion

Mastering JavaScript code structure is crucial for becoming a proficient developer. By understanding the core elements such as statements, variables, functions, and control flow, you gain the ability to create robust and efficient web applications. Whether you’re building a simple webpage or a complex web app, JavaScript’s flexibility and versatility empower you to bring your ideas to life.

As you continue your JavaScript journey, remember to practice regularly, explore new concepts, and leverage resources such as documentation, tutorials, and community forums. With a solid grasp of JavaScript code structure, you’re equipped to embark on exciting coding adventures and create innovative solutions in the dynamic world of web development.

Java Script Hello World

This part of the tutorial is about core JavaScript, the language itself.

But we need a working environment to run our scripts and, since this book is online, the browser is a good choice. We’ll keep the amount of browser-specific commands (like alert) to a minimum so that you don’t spend time on them if you plan to concentrate on another environment (like Node.js). We’ll focus on JavaScript in the browser in the next part of the tutorial.

So first, let’s see how we attach a script to a webpage. For server-side environments (like Node.js), you can execute the script with a command like "node my.js".

The “script” tag

JavaScript programs can be inserted almost anywhere into an HTML document using the <script> tag.

For instance:

<!DOCTYPE HTML>
<html>

<body>

  <p>Before the script...</p>

  <script>
    alert( 'Hello, world!' );
  </script>

  <p>...After the script.</p>

</body>

</html>

You can run the example by clicking the “Play” button in the right-top corner of the box above.

The <script> the tag contains JavaScript code which is automatically executed when the browser processes the tag.

Modern markup

The <script> the tag has a few attributes that are rarely used nowadays but can still be found in old code: The type attribute: <script type=…>

The old HTML standard, HTML4, required a script to have a type. Usually, it was type=”text/javascript”. It’s not required anymore. Also, the modern HTML standard totally changed the meaning of this attribute. Now, it can be used for JavaScript modules. But that’s an advanced topic, we’ll talk about modules in another part of the tutorial. The language attribute: <script language=…>

This attribute was meant to show the language of the script. This attribute no longer makes sense because JavaScript is the default language. There is no need to use it. Comments before and after scripts.

In really ancient books and guides, you may find comments inside <script> tags, like this:

<script type="text/javascript"><!--
    ...
//--></script>

This trick isn’t used in modern JavaScript. These comments hide JavaScript code from old browsers that didn’t know how to process the <script> tag. Since browsers released in the last 15 years don’t have this issue, this kind of comment can help you identify ancient code.

External scripts

If we have a lot of JavaScript code, we can put it into a separate file.

Script files are attached to HTML with the src attribute:

<script src="/path/to/script.js"></script>

Here, /path/to/script.js is an absolute path to the script from the site root. One can also provide a relative path from the current page. For instance, src="script.js" would mean a file "script.js" in the current folder.

We can give a full URL as well. For instance:

<script src="https://cdnjs.cloudflare.com/ajax/libs/lodash.js/4.17.11/lodash.js"></script>

To attach several scripts, use multiple tags:

<script src="/js/script1.js"></script>
<script src="/js/script2.js"></script>
…

Please note:

As a rule, only the simplest scripts are put into HTML. More complex ones reside in separate files.

The benefit of a separate file is that the browser will download it and store it in its cache.

Other pages that reference the same script will take it from the cache instead of downloading it, so the file is actually downloaded only once.

That reduces traffic and makes pages faster. If src is set, the script content is ignored.

A single <script> tag can’t have both the src attribute and code inside.

This won’t work:

<script src="file.js">
  alert(1); // the content is ignored, because src is set
</script>

We must choose either an external <script src="…"> or a regular <script> with code.

The example above can be split into two scripts to work:

<script src="file.js"></script>
<script>
  alert(1);
</script>

Summary

  • We can use a <script> tag to add JavaScript code to a page.
  • The type and language attributes are not required.
  • A script in an external file can be inserted with <script src="path/to/script.js"></script>.

There is much more to learn about browser scripts and their interaction with the webpage. But let’s keep in mind that this part of the tutorial is devoted to the JavaScript language, so we shouldn’t distract ourselves with browser-specific implementations of it. We’ll be using the browser as a way to run JavaScript, which is very convenient for online reading, but only one of many.

Tasks

Show an alert

importance: 5

Create a page that shows the message “I’m JavaScript!”.

Do it in a sandbox, or on your hard drive, doesn’t matter, just ensure that it works.

Demo in a new window solution

Show an alert with external script

importance: 5

Take the solution of the previous task Show an alert. Modify it by extracting the script content into an external file alert.js, residing in the same folder.

Open the page, and ensure that the alert works.

Java Script Developer Console

Code is prone to errors. You will quite likely make errors while writing the codes… Oh, what am I talking about? You are absolutely going to make errors, at least if you’re a human, not a robot read what Wiki tells about coding. 

But in the browser, users don’t see errors by default. So, if something goes wrong in the script, we won’t see what’s broken and can’t fix it.

To see errors and get a lot of other useful information about scripts, “developer tools” have been embedded in browsers.

Most developers lean towards Chrome or Firefox for development because those browsers have the best developer tools. Other browsers also provide developer tools, sometimes with special features, but are usually playing “catch-up” to Chrome or Firefox. So most developers have a “favorite” browser and switch to others if a problem is browser-specific.

Developer tools are potent; they have many features. To start, we’ll learn how to open them, look at errors, and run JavaScript commands.

Google Chrome

Open the page bug.html.

There’s an error in the JavaScript code on it. It’s hidden from a regular visitor’s eyes, so let’s open developer tools to see it.

Press F12 or, if you’re on Mac, then Cmd+Opt+J.

The developer tools will open on the Console tab by default.

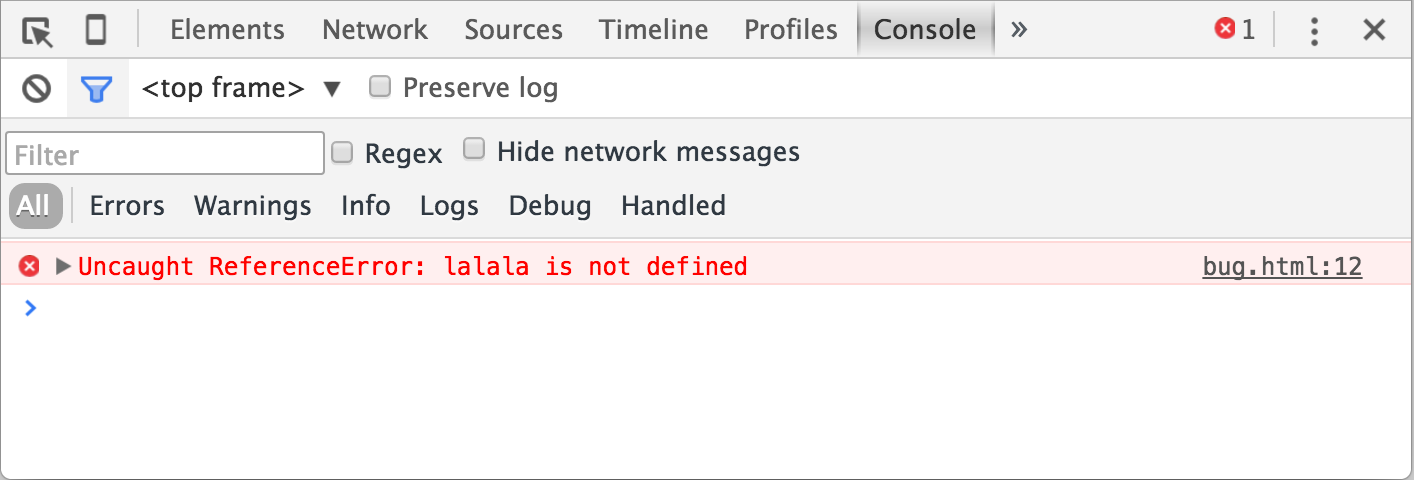
It looks somewhat like this:

The exact look of developer tools depends on your version of Chrome. It changes from time to time but should be similar.

  • Here we can see the red-colored error message. In this case, the script contains an unknown “lalala” command.
  • On the right, there is a clickable link to the source bug.html:12 with the line number where the error has occurred.

Below the error message, there is a blue > symbol. It marks a “command line” where we can type JavaScript commands. Press Enter to run them.

Now we can see errors, and that’s enough for a start. We’ll come back to developer tools later and cover debugging more in-depth in the chapter Debugging in Chrome.Multi-line input

Usually, when we put a line of code into the console, and then press Enter, it executes.

To insert multiple lines, press Shift+Enter. This way one can enter long fragments of JavaScript code.

Firefox, Edge, and others

Most other browsers use F12 to open developer tools.

The look & feel of them is quite similar. Once you know how to use one of these tools (you can start with Chrome), you can easily switch to another.

Safari

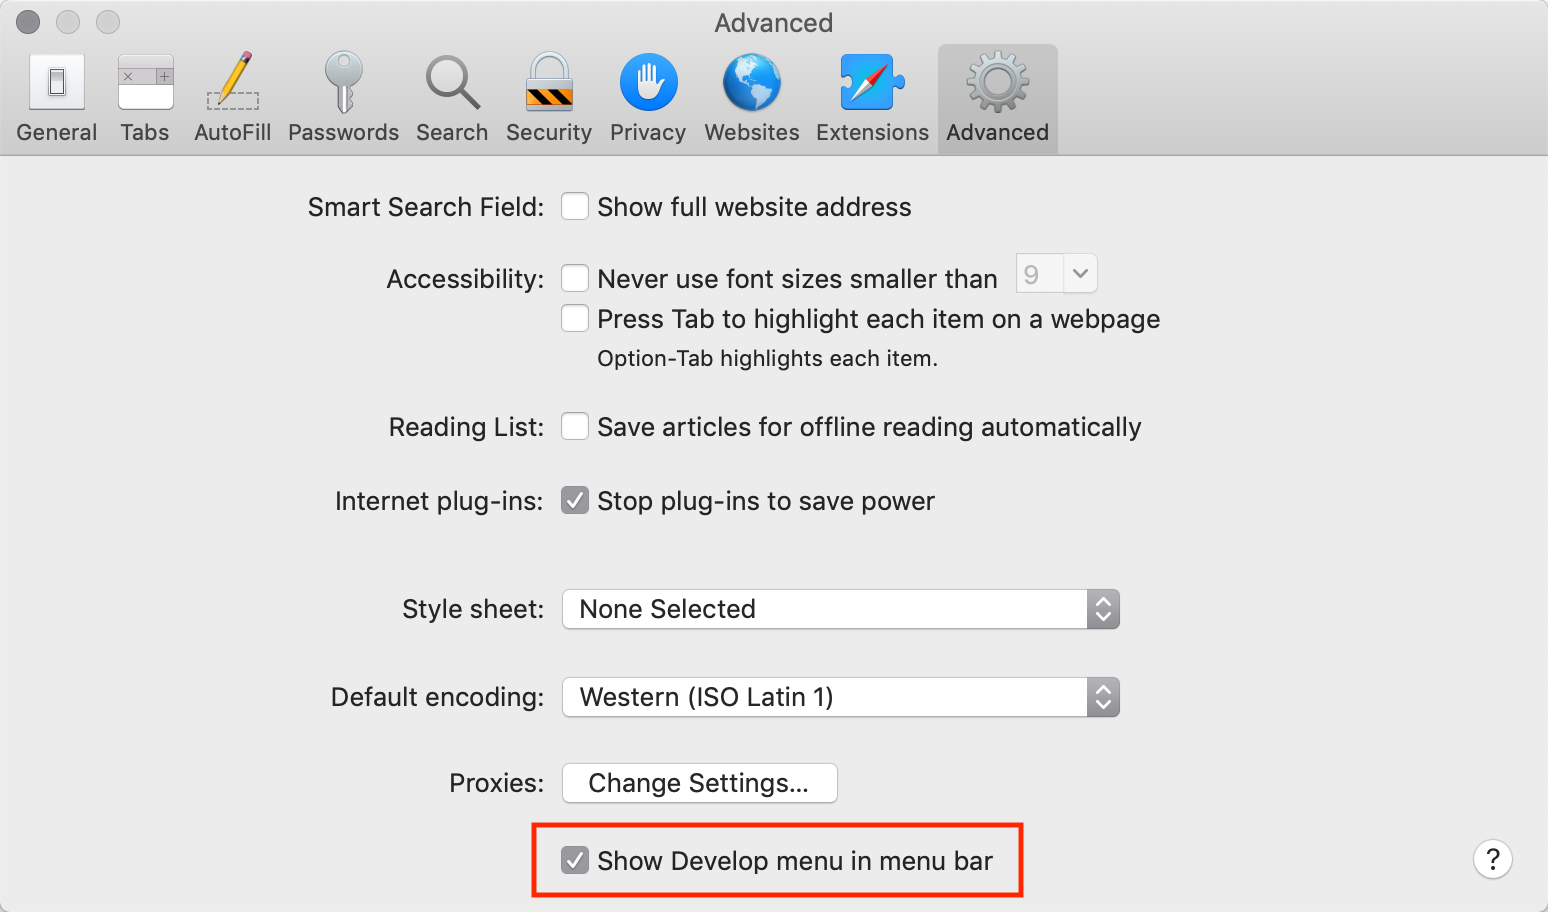
Safari (Mac browser, not supported by Windows/Linux) is a little bit special here. We need to enable the “Develop menu” first.

Open Preferences and go to the “Advanced” pane. There’s a checkbox at the bottom:

Now Cmd+Opt+C can toggle the console. Also, note that the new top menu item named “Develop” has appeared. It has many commands and options.

Summary

  • Developer tools allow us to see errors, run commands, examine variables, and much more.
  • They can be opened with F12 for most browsers on Windows. Chrome for Mac needs Cmd+Opt+J, Safari: Cmd+Opt+C (need to enable first).

Now we have the environment ready. In the next section, we’ll get down to JavaScript.

Python Indentation & Basic Syntax & Comment Statemetns

In this tutorial, you will learn about Python statements, why indentation is important in the use of comments in programming.

Python Statement

Instructions that a Python interpreter can execute are called statements. For example, a = 1 is an assignment statement. if statement, for statement, while statement, etc. are other kinds of statements which will be discussed later.

Multi-line statement

In Python, the end of a statement is marked by a newline character. But we can make a statement extend over multiple lines with the line continuation character (\). For example:

a = 1 + 2 + 3 + \
    4 + 5 + 6 + \
    7 + 8 + 9

This is an explicit line continuation. In Python, line continuation is implied inside parentheses ( ), brackets [ ], and braces { }. For instance, we can implement the above multi-line statement as:

a = (1 + 2 + 3 +
    4 + 5 + 6 +
    7 + 8 + 9)

Here, the surrounding parentheses ( ) do the line continuation implicitly. Same is the case with [ ] and { }. For example:

colors = ['red',
          'blue',
          'green']

We can also put multiple statements in a single line using semicolons, as follows:

a = 1; b = 2; c = 3

Python Indentation

Most of the programming languages like C, C++, and Java use braces { } to define a block of code. Python, however, uses indentation.

A code block (body of a function, loop, etc.) starts with indentation and ends with the first unindented line. The amount of indentation is up to you, but it must be consistent throughout that block.

Generally, four whitespaces are used for indentation and are preferred over tabs. Here is an example.

for i in range(1,11):
    print(i)
    if i == 5:
        break

The enforcement of indentation in Python makes the code look neat and clean. This results in Python programs that look similar and consistent.

Indentation can be ignored in line continuation, but it’s always a good idea to indent. It makes the code more readable. For example:

if True:
    print('Hello')
    a = 5

and

if True: print('Hello'); a = 5

both are valid and do the same thing, but the former style is clearer.

Incorrect indentation will result in IndentationError.


Python Comments

Comments are very important while writing a program. They describe what is going on inside a program so that a person looking at the source code does not have a hard time figuring it out.

You might forget the key details of the program you just wrote in a month’s time. So taking the time to explain these concepts in the form of comments is always fruitful.

In Python, we use the hash (#) symbol to start writing a comment.

It extends up to the newline character. Comments are for programmers to better understand a program. Python Interpreter ignores comments.

#This is a comment
#print out Hello
print('Hello')

Multi-line comments

We can have comments that extend up to multiple lines. One way is to use the hash(#) symbol at the beginning of each line. For example:

#This is a long comment
#and it extends
#to multiple lines

Another way of doing this is to use triple quotes, either ”’ or “””.

These triple quotes are generally used for multi-line strings. But they can be used as a multi-line comment as well. Unless they are not docstrings, they do not generate any extra code.

"""This is also a
perfect example of
multi-line comments"""

To learn more about comments, visit Python Comments.


Docstrings in Python

A docstring is short for documentation string.

Python docstrings (documentation strings) are the string literals that appear right after the definition of a function, method, class, or module.

Triple quotes are used while writing docstrings. For example:

def double(num):
    """Function to double the value"""
    return 2*num

Docstrings appear right after the definition of a function, class, or a module. This separates docstrings from multiline comments using triple quotes.

The docstrings are associated with the object as their __doc__ attribute.

So, we can access the docstrings of the above function with the following lines of code:

def double(num):
    """Function to double the value"""
    return 2*num
print(double.__doc__)

Output

Function to double the value

Senior Python Developer Interview Questions

Looking for a Senior Python Developer to get the most out of your Development team? Ask a balanced set of technical as well as non-technical interview questions and hire the best candidate for the job.


Jump to section:

  • Introduction
  • Computer Science questions
  • Role-specific questions

Senior Python Developer Interview Questions

Technical roles demand strong candidates with learning skills and passion for the job. Along with these qualities, this profile requires a solid background in Computer Science. When sourcing for a Senior Python Developer, look for the following:

  • Analyze their understanding of basic algorithmic concepts and find out how they find/think/sort. Figure out if they inherit a wider understanding of databases. Ask about their approach to modeling.
  • How do they stay up-to-date with the latest developments? Probe for the technical books they prefer to read. Are there any blogs they read regularly?
  • Do they have active Github accounts? Did they work on any open-source software projects?

All these Senior Python Developer interview questions will help you gauge their intellectual interest in their chosen field. Ask these questions to let the committed and inquisitive candidates stand out.

Computer Science questions

  • What makes up a good unit test?
  • Can you implement a binary search of a sorted array of integers by using pseudo-code?
  • What are the core principles of a REST API? Can you tell how it is a different philosophy from RPC?

Role-specific questions

  • Explain how the arguments are passed in Python.
  • Is it possible that a producer thread is reading from the network and a consumer thread is writing to a file?
  • Can you give me an example of a filter?
  • In python, why functions are first-class objects?
  • Mention the tools that you use for profiling, linting, and debugging.
  • In python, how can one manage a memory?
  • What do you mean by direct and list comprehensions?
  • Mention some difference between Python 2.x and 3.x
  • What does it mean when we say that a certain lambda expression makes a closure?
  • Does it mean python does not use real threads when we say it uses a global interpreter lock?
  • Can you find the largest palindrome made from the product of two 2-digit numbers?