Unraveling JavaScript Logical Operators: A Comprehensive Guide
In the world of JavaScript programming, logical operators are the building blocks of decision-making and complex conditions. They allow developers to create logical expressions that evaluate to true or false, enabling dynamic control flow in their code. In this blog, we’ll explore the logical operators in JavaScript, including && (AND), || (OR), and ! (NOT), along with their practical applications and best practices.
1. AND Operator (&&)
The AND (&&) operator returns true if both operands are true; otherwise, it returns false. It is often used to combine multiple conditions.
// Example of the AND operator
let isAdult = true;
let hasLicense = true;

if (isAdult && hasLicense) {
  console.log("You can drive!");
} else {
  console.log("You are not eligible to drive.");
}
In this example, the message “You can drive!” will be printed only if both isAdult and hasLicense are true.
2. OR Operator (||)
The OR (||) operator returns true if at least one of the operands is true. It is used to create conditions where either of the conditions can be true.
// Example of the OR operator
let isWeekend = false;
let isHoliday = true;

if (isWeekend || isHoliday) {
  console.log("It's time to relax!");
} else {
  console.log("Back to work!");
}
Here, the message “It’s time to relax!” will be printed if either isWeekend or isHoliday is true.
3. NOT Operator (!)
The NOT (!) operator is a unary operator that reverses the logical state of its operand. If the operand is true, ! makes it false, and vice versa.
// Example of the NOT operator
let isLoggedOut = true;

if (!isLoggedOut) {
  console.log("Welcome back!");
} else {
  console.log("Please log in.");
}
In this case, the message “Please log in.” will be printed because !isLoggedOut evaluates to false.
Combining Logical Operators
Logical operators can be combined to create more complex conditions. They have precedence rules (! has the highest precedence, followed by &&, then ||), but parentheses can be used to clarify the order of operations.
// Combining logical operators
let isStudent = true;
let isRegistered = false;
let isEnrolled = true;

if (isStudent && (isRegistered || isEnrolled)) {
  console.log("You are ready for the course.");
} else {
  console.log("Please complete your registration.");
}
In this example, the message “You are ready for the course.” will be printed if isStudent is true and either isRegistered or isEnrolled is true.
Practical Applications
Form Validation: Checking if all required fields are filled (&&) or allowing different validation scenarios (||).
User Permissions: Determining if a user has the necessary permissions (&&) or providing access in specific situations (||).
Conditional Rendering: Showing different content based on various conditions in a user interface.
Best Practices
Use Parentheses for Clarity: When combining multiple logical operators, use parentheses to ensure the intended order of operations.
Avoid Overly Complex Conditions: Complex conditions can lead to confusion. Break them down into smaller, more manageable parts if needed.
Understand Short-circuiting: JavaScript’s logical operators have short-circuiting behavior, where the evaluation stops as soon as the result is known.
Conclusion
Logical operators in JavaScript provide powerful tools for creating dynamic and flexible conditions in your code. Whether you need to check multiple conditions, handle different scenarios, or validate user input, && (AND), || (OR), and ! (NOT) operators are indispensable.
By mastering these operators, you gain the ability to create robust and efficient JavaScript applications. So, the next time you’re faced with complex decision-making in your code, reach for these logical operators to craft elegant and effective solutions. With logical operators, you have the power to navigate through various scenarios and create intelligent, responsive applications that meet your users’ needs.
while (condition) {
  // code
  // so-called "loop body"
}
While the condition is truthy, the code from the loop body is executed.
For instance, the loop below outputs i while i < 3:
let i = 0;
while (i < 3) { // shows 0, then 1, then 2
  alert( i );
  i++;
}
A single execution of the loop body is called an iteration. The loop in the example above makes three iterations.
If i++ was missing from the example above, the loop would repeat (in theory) forever. In practice, the browser provides ways to stop such loops, and in server-side JavaScript, we can kill the process.
Any expression or variable can be a loop condition, not just comparisons: the condition is evaluated and converted to a boolean by while.
For instance, a shorter way to write while (i != 0) is while (i):
let i = 3;
while (i) { // when i becomes 0, the condition becomes falsy, and the loop stops
  alert( i );
  i--;
}
Curly braces are not required for a single-line body
If the loop body has a single statement, we can omit the curly braces {…}:
The condition check can be moved below the loop body using the do..while syntax:
do {
  // loop body
} while (condition);
The loop will first execute the body, then check the condition, and, while it’s truthy, execute it again and again.
For example:
let i = 0;
do {
  alert( i );
  i++;
} while (i < 3);
This form of syntax should only be used when you want the body of the loop to execute at least once regardless of the condition being truthy. Usually, the other form is preferred: while(…) {…}.
The for loop is more complex, but it’s also the most commonly used loop.
It looks like this:
for (begin; condition; step) {
  // ... loop body ...
}
Let’s learn the meaning of these parts by example. The loop below runs alert(i) for i from 0 up to (but not including) 3:
for (let i = 0; i < 3; i++) { // shows 0, then 1, then 2
  alert(i);
}
Let’s examine the for statement part-by-part:
part
begin
i = 0
Executes once upon entering the loop.
condition
i < 3
Checked before every loop iteration. If false, the loop stops.
body
alert(i)
Runs again and again while the condition is truthy.
step
i++
Executes after the body on each iteration.
The general loop algorithm works like this:
Run begin
→ (if condition → run body and run step)
→ (if condition → run body and run step)
→ (if condition → run body and run step)
→ ...
That is, begin executes once, and then it iterates: after each condition test, body and step are executed.
If you are new to loops, it could help to go back to the example and reproduce how it runs step-by-step on a piece of paper.
Here’s exactly what happens in our case:
// for (let i = 0; i < 3; i++) alert(i)

// run begin
let i = 0
// if condition → run body and run step
if (i < 3) { alert(i); i++ }
// if condition → run body and run step
if (i < 3) { alert(i); i++ }
// if condition → run body and run step
if (i < 3) { alert(i); i++ }
// ...finish, because now i == 3
Inline variable declaration
Here, the “counter” variable i is declared right in the loop. This is called an “inline” variable declaration. Such variables are visible only inside the loop.
for (let i = 0; i < 3; i++) {
  alert(i); // 0, 1, 2
}
alert(i); // error, no such variable
Instead of defining a variable, we could use an existing one:
let i = 0;

for (i = 0; i < 3; i++) { // use an existing variable
  alert(i); // 0, 1, 2
}

alert(i); // 3, visible, because declared outside of the loop
Normally, a loop exits when its condition becomes falsy.
But we can force the exit at any time using the special break directive.
For example, the loop below asks the user for a series of numbers, “breaking” when no number is entered:
let sum = 0;

while (true) {

  let value = +prompt("Enter a number", '');

  if (!value) break; // (*)

  sum += value;

}
alert( 'Sum: ' + sum );
The break directive is activated at the line (*) if the user enters an empty line or cancels the input. It stops the loop immediately, passing control to the first line after the loop. Namely, alert.
The combination “infinite loop + break as needed” is great for situations when a loop’s condition must be checked not in the beginning or end of the loop, but in the middle or even in several places of its body.
The continue directive is a “lighter version” of break. It doesn’t stop the whole loop. Instead, it stops the current iteration and forces the loop to start a new one (if the condition allows).
We can use it if we’re done with the current iteration and would like to move on to the next one.
The loop below uses continue to output only odd values:
for (let i = 0; i < 10; i++) {

  // if true, skip the remaining part of the body
  if (i % 2 == 0) continue;

  alert(i); // 1, then 3, 5, 7, 9
}
For even values of i, the continue directive stops executing the body and passes control to the next iteration of for (with the next number). So the alert is only called for odd values.The continue directive helps decrease nesting
A loop that shows odd values could look like this:
for (let i = 0; i < 10; i++) {

  if (i % 2) {
    alert( i );
  }

}
From a technical point of view, this is identical to the example above. Surely, we can just wrap the code in an if block instead of using continue.
But as a side-effect, this created one more level of nesting (the alert call inside the curly braces). If the code inside of if is longer than a few lines, that may decrease the overall readability.No break/continue to the right side of ‘?’
Please note that syntax constructs that are not expressions cannot be used with the ternary operator ?. In particular, directives such as break/continue aren’t allowed there.
For example, if we take this code:
if (i > 5) {
  alert(i);
} else {
  continue;
}
…and rewrite it using a question mark:
(i > 5) ? alert(i) : continue; // continue isn't allowed here
…it stops working: there’s a syntax error.
This is just another reason not to use the question mark operator ? instead of if.
Sometimes we need to break out from multiple nested loops at once.
For example, in the code below we loop over i and j, prompting for the coordinates (i, j) from (0,0) to (2,2):
for (let i = 0; i < 3; i++) {

  for (let j = 0; j < 3; j++) {

    let input = prompt(`Value at coords (${i},${j})`, '');

    // what if we want to exit from here to Done (below)?
  }
}

alert('Done!');
We need a way to stop the process if the user cancels the input.
The ordinary break after input would only break the inner loop. That’s not sufficient – labels, come to the rescue!
A label is an identifier with a colon before a loop:
labelName: for (...) {
  ...
}
The break <labelName> statement in the loop below breaks out to the label:
outer: for (let i = 0; i < 3; i++) {

  for (let j = 0; j < 3; j++) {

    let input = prompt(`Value at coords (${i},${j})`, '');

    // if an empty string or canceled, then break out of both loops
    if (!input) break outer; // (*)

    // do something with the value...
  }
}
alert('Done!');
In the code above, break outer looks upwards for the label named outer and breaks out of that loop.
So the control goes straight from (*) to alert('Done!').
We can also move the label onto a separate line:
outer:
for (let i = 0; i < 3; i++) { ... }
The continue directive can also be used with a label. In this case, code execution jumps to the next iteration of the labeled loop.Labels do not allow to “jump” anywhere
Labels do not allow us to jump into an arbitrary place in the code.
For example, it is impossible to do this:
break label; // jump to the label below (doesn't work)

label: for (...)
A break directive must be inside a code block. Technically, any labelled code block will do, e.g.:
label: {
  // ...
  break label; // works
  // ...
}
…Although, 99.9% of the time break used is inside loops, as we’ve seen in the examples above.
Mastering Conditional Branching in JavaScript: The if Statement and Ternary Operator
Conditional branching is a fundamental concept in programming, allowing developers to create dynamic behavior based on conditions. In JavaScript, two primary tools for conditional branching are the if statement and the ternary operator (? :). In this blog, we’ll explore these constructs, their syntax, and common use cases.
The if Statement
The if statement is a foundational building block of JavaScript programming. It allows you to execute a block of code if a specified condition is true. Here’s the basic syntax:
if (condition) {
  // Code block to execute if condition is true
} else {
  // Code block to execute if condition is false
}
Let’s look at a simple example:
let temperature = 25;

if (temperature > 30) {
  console.log("It's a hot day!");
} else if (temperature > 20) {
  console.log("It's a nice day.");
} else {
  console.log("It's a cold day.");
}
In this example:
If temperature is greater than 30, “It’s a hot day!” will be printed.
If temperature is greater than 20 but not greater than 30, “It’s a nice day.” will be printed.
If temperature is 20 or lower, “It’s a cold day.” will be printed.
The Ternary Operator (? :)
The ternary operator provides a concise way to write simple if-else statements in a single line. It’s often used for assigning values based on a condition. The syntax is as follows:
condition ? expression1 : expression2
If condition is true, expression1 is evaluated; otherwise, expression2 is evaluated. Here’s an example:
let age = 20;
let message = (age >= 18) ? "You are an adult" : "You are not an adult";

console.log(message); // Output: "You are an adult"
Nested if Statements
You can also nest if statements within each other to handle more complex conditions. Here’s an example:
let score = 85;
let grade;

if (score >= 90) {
  grade = "A";
} else {
  if (score >= 80) {
    grade = "B";
  } else {
    grade = "C";
  }
}

console.log("Your grade is: " + grade); // Output: "Your grade is: B"
Common Use Cases
User Authentication:
  let isLoggedIn = true;
  let message = isLoggedIn ? "Welcome back!" : "Please log in.";
Validation:
  let input = "123";
  let isValid = (input.length > 0) ? true : false;
Conditional Rendering in UI:
  let isAdmin = false;
  let adminPanel = isAdmin ? "<AdminPanel />" : "<UserPanel />";
Best Practices
Use clear and descriptive conditions for readability.
Properly indent nested if statements for better code organization.
Consider readability and simplicity when deciding between the if statement and the ternary operator.
Conclusion
Conditional branching is a powerful feature of JavaScript that allows you to control the flow of your code based on different conditions. The if statement provides a traditional and versatile way to handle conditions, while the ternary operator offers a concise alternative for simple if-else scenarios.
By mastering these tools, you can create dynamic and responsive applications that adapt to various scenarios. Whether you’re building a user interface that responds to user input or implementing logic for data processing, conditional branching is a vital skill for any JavaScript developer.
So, the next time you need to make decisions in your code, reach for the if statement or the ternary operator to handle those conditions effectively. With these tools in your programming toolbox, you have the power to create sophisticated and intelligent JavaScript applications.
JavaScript Interaction: Exploring alert(), prompt(), and confirm()
JavaScript, the language that breathes life into web pages, offers powerful ways to interact with users through alert boxes, prompts for input, and confirmation dialogs. These simple yet effective tools are essential for creating dynamic and engaging user experiences. In this blog, we’ll delve into JavaScript’s alert(), prompt(), and confirm() functions, exploring how they enhance interactivity on the web.
1. Alert Boxes with alert()
The alert() function is used to display a message box with a specified message and an OK button. It’s commonly used for displaying information to users or notifying them of important updates.
alert("Welcome to our website!");
2. Prompting for Input with prompt()
The prompt() function displays a dialog box that prompts the user for input. It takes two arguments: the message to display and an optional default value.
let userName = prompt("Please enter your name:", "John Doe");

if (userName !== null) {
  alert("Hello, " + userName + "! Welcome to our site.");
} else {
  alert("You did not enter a name. Please refresh and try again.");
}
In this example, the user is prompted to enter their name. If they click “OK” without entering anything or click “Cancel,” the prompt() function returns null.
3. Confirmation Dialogs with confirm()
The confirm() function displays a dialog box with a message and two buttons: OK and Cancel. It’s commonly used for obtaining user consent or confirmation for an action.
let userChoice = confirm("Are you sure you want to delete this item?");

if (userChoice) {
  // Delete the item
  alert("Item deleted successfully.");
} else {
  alert("Operation canceled.");
}
When the user clicks “OK,” confirm() returns true. If the user clicks “Cancel,” it returns false.
Best Practices and Use Cases
Error Handling: Use alert() to notify users of errors or incorrect inputs.
User Input: Use prompt() to gather user input for forms or customization options.
Confirmation: Use confirm() to confirm critical actions such as deleting items or submitting forms.
Enhancing User Experience
These interaction functions are essential for creating user-friendly interfaces. However, it’s important to use them judiciously to avoid disrupting the user experience with excessive alerts or prompts.
Handling User Input
When using prompt(), always validate and sanitize user input to prevent security vulnerabilities and ensure data integrity. Here’s an example of validating user input for a number:
let userInput = prompt("Please enter a number:");

if (userInput !== null) {
  let number = parseInt(userInput);

  if (!isNaN(number)) {
    alert("You entered: " + number);
  } else {
    alert("Invalid input. Please enter a valid number.");
  }
} else {
  alert("You canceled the operation.");
}
Conclusion
JavaScript’s alert(), prompt(), and confirm() functions are indispensable tools for creating interactive and user-friendly web applications. Whether you’re welcoming users, gathering input, or confirming actions, these functions provide a seamless way to engage with your audience.
As you integrate these functions into your projects, remember to:
Use them sparingly to avoid overwhelming users.
Validate and sanitize user input for security and data integrity.
Provide clear and concise messages to guide users through interactions.
By harnessing the power of JavaScript’s interaction functions, you can create web experiences that are not only informative but also intuitive and engaging. So, next time you need to communicate with your users, reach for alert(), prompt(), and confirm() to add that extra layer of interactivity to your web applications.
Code is always prone to errors. You will quite often likely make errors… Oh, what we are discussing ? You are absolutely going to make errors, at least if you’re a human, not a robot.
But in the browser, users don’t see errors by default in the webpage. So, if something goes broken or wrong in the script, we won’t see what’s broken and can’t fix it.
To see errors and get a lot of other useful information about scripts, “developer tools” the best place where we can c how our code have been embedded in browsers.
Most developers lean towards Chrome or Firefox for development because those browsers have the best developer tools. You can open your developer tool by the combination of keypress (Ctrl+Shift+I) . Other browsers also provide developer tools, sometimes with special features, but are usually playing “catch-up” to Chrome or Firefox. So most developers have a “favorite” browser and switch to others if a problem is browser-specific.
Developer tools are potent; they have many features. To start, we’ll learn how to open them, look at errors, and run JavaScript commands.
There’s an error in the JavaScript code on it. It’s hidden from a regular visitor’s eyes, so let’s open developer tools to see it.
Alternative method Press F12 or, if you’re on Mac, then Cmd+Opt+J.
The developer tools will open on the Console tab by default.
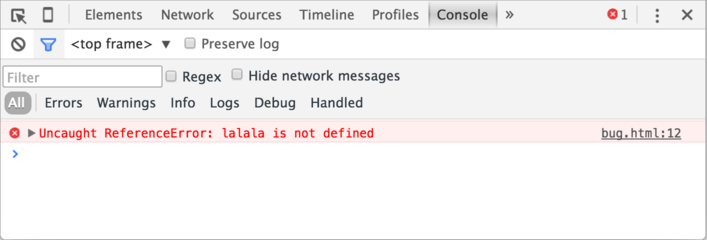
It looks somewhat like this:
The exact look of developer tools depends on your version of Chrome. It changes from time to time but should be similar.
Here we can see the red-colored error message. In this case, the script contains an unknown “lalala” command.
On the right, there is a clickable link to the source bug.html:12 with the line number where the error has occurred.
Below the error message, there is a blue > symbol. It marks a “command line” where we can type JavaScript commands. Press Enter to run them (Shift+Enter to input multi-line commands).
Now we can see errors, and that’s enough for a start. We’ll come back to developer tools later and cover debugging more in-depth in the chapter Debugging in Chrome.
If the first character from the first string is greater (or less) than the other string’s, then the first string is greater (or less) than the second. We’re done.
Otherwise, if both strings’ first characters are the same, compare the second characters the same way.
Repeat until the end of either string.
If both strings end at the same length, then they are equal. Otherwise, the longer string is greater.
In the first example above, the comparison 'Z' > 'A' gets to a result at the first step.
The second comparison 'Glow' and 'Glee' needs more steps as strings are compared character-by-character:
G is the same as G.
l is the same as l.
o is greater than e. Stop here. The first string is greater.
Not a real dictionary, but Unicode order
The comparison algorithm given above is roughly equivalent to the one used in dictionaries or phone books, but it’s not exactly the same.
For instance, case matters. A capital letter "A" is not equal to the lowercase "a". Which one is greater? The lowercase "a". Why? Because the lowercase character has a greater index in the internal encoding table JavaScript uses (Unicode). We’ll get back to specific details and consequences of this in the chapter Strings.
Comparison of different types
When comparing values of different types, JavaScript converts the values to numbers.
For example:
alert( '2' > 1 ); // true, string '2' becomes a number 2
alert( '01' == 1 ); // true, string '01' becomes a number 1
For boolean values, true becomes 1 and false becomes 0.
One of them is true as a boolean and the other one is false as a boolean.
For example:
let a = 0;
alert( Boolean(a) ); // false

let b = "0";
alert( Boolean(b) ); // true

alert(a == b); // true!
From JavaScript’s standpoint, this result is quite normal. An equality check converts values using the numeric conversion (hence "0" becomes 0), while the explicit Boolean conversion uses another set of rules.
Strict equality
A regular equality check == has a problem. It cannot differentiate 0 from false:
alert( 0 == false ); // true
The same thing happens with an empty string:
alert( '' == false ); // true
This happens because operands of different types are converted to numbers by the equality operator ==. An empty string, just like false, becomes a zero.
What to do if we’d like to differentiate 0 from false?
A strict equality operator === checks the equality without type conversion.
In other words, if a and b are of different types, then a === b immediately returns false without an attempt to convert them.
Let’s try it:
alert( 0 === false ); // false, because the types are different
There is also a “strict non-equality” operator !== analogous to !=.
The strict equality operator is a bit longer to write, but makes it obvious what’s going on and leaves less room for errors.
Comparison with null and undefined
There’s a non-intuitive behavior when null or undefined are compared to other values.For a strict equality check ===
These values are different, because each of them is a different type.
alert( null === undefined ); // false
For a non-strict check ==
There’s a special rule. These two are a “sweet couple”: they equal each other (in the sense of ==), but not any other value.
alert( null == undefined ); // true
For maths and other comparisons < > <= >=
null/undefined are converted to numbers: null becomes 0, while undefined becomes NaN.
Now let’s see some funny things that happen when we apply these rules. And, what’s more important, how to not fall into a trap with them.
Mathematically, that’s strange. The last result states that “null is greater than or equal to zero”, so in one of the comparisons above it must be true, but they are both false.
The reason is that an equality check == and comparisons > < >= <= work differently. Comparisons convert null to a number, treating it as 0. That’s why (3) null >= 0 is true and (1) null > 0 is false.
On the other hand, the equality check == for undefined and null is defined such that, without any conversions, they equal each other and don’t equal anything else. That’s why (2) null == 0 is false.
An incomparable undefined
The value undefined shouldn’t be compared to other values:
Comparisons (1) and (2) return false because undefined gets converted to NaN and NaN is a special numeric value which returns false for all comparisons.
The equality check (3) returns false because undefined only equals null, undefined, and no other value.
Avoid problems
Why did we go over these examples? Should we remember these peculiarities all the time? Well, not really. Actually, these tricky things will gradually become familiar over time, but there’s a solid way to avoid problems with them:
Treat any comparison with undefined/null except the strict equality === with exceptional care.
Don’t use comparisons >= > < <= with a variable which may be null/undefined, unless you’re really sure of what you’re doing. If a variable can have these values, check for them separately.
Summary
Comparison operators return a boolean value.
Strings are compared letter-by-letter in the “dictionary” order.
When values of different types are compared, they get converted to numbers (with the exclusion of a strict equality check).
The values null and undefined equal == each other and do not equal any other value.
Be careful when using comparisons like > or < with variables that can occasionally be null/undefined. Checking for null/undefined separately is a good idea.
For a long time, JavaScript evolved without compatibility issues. New features were added to the language while old functionality didn’t change.
That had the benefit of never breaking existing code. But the downside was that any mistake or an imperfect decision made by JavaScript’s creators got stuck in the language forever.
This was the case until 2009 when ECMAScript 5 (ES5) appeared. It added new features to the language and modified some of the existing ones. To keep the old code working, most such modifications are off by default. You need to explicitly enable them with a special directive: "use strict".
“use strict”
The directive looks like a string: "use strict" or 'use strict'. When it is located at the top of a script, the whole script works the “modern” way.
For example:
"use strict";

// this code works the modern way
...
Quite soon we’re going to learn functions (a way to group commands), so let’s note in advance that "use strict" can be put at the beginning of a function. Doing that enables strict mode in that function only. But usually people use it for the whole script.Ensure that “use strict” is at the top
Please make sure that "use strict" is at the top of your scripts, otherwise strict mode may not be enabled.
Strict mode isn’t enabled here:
alert("some code");
// "use strict" below is ignored--it must be at the top

"use strict";

// strict mode is not activated
Only comments may appear above "use strict".There’s no way to cancel use strict
There is no directive like "no use strict" that reverts the engine to old behavior.
Once we enter strict mode, there’s no going back.
Browser console
When you use a developer console to run code, please note that it doesn’t use strict by default.
Sometimes, when use strict makes a difference, you’ll get incorrect results.
So, how to actually use strict in the console?
First, you can try to press Shift+Enter to input multiple lines, and put use strict on top, like this:
'use strict'; <Shift+Enter for a newline>
//  ...your code
<Enter to run>
It works in most browsers, namely Firefox and Chrome.
If it doesn’t, e.g. in an old browser, there’s an ugly, but reliable way to ensure use strict. Put it inside this kind of wrapper:
One could recommend to start scripts with "use strict"… But you know what’s cool?
Modern JavaScript supports “classes” and “modules” – advanced language structures (we’ll surely get to them), that enable use strict automatically. So we don’t need to add the "use strict" directive, if we use them.
So, for now "use strict"; is a welcome guest at the top of your scripts. Later, when your code is all in classes and modules, you may omit it.
As of now, we’ve got to know about use strict in general.
In the next chapters, as we learn language features, we’ll see the differences between the strict and old modes. Luckily, there aren’t many and they actually make our lives better.
All examples in this tutorial assume strict mode unless (very rarely) specified otherwise.
Exploring JavaScript Basic Operators and Math Functions
JavaScript is a versatile language that powers much of the interactivity on the web. At its core are fundamental operators and math functions that allow developers to manipulate data and create dynamic web applications. Whether you’re just starting with JavaScript or looking to expand your knowledge, understanding these basics is essential. Let’s dive into JavaScript’s basic operators and math functions.
Basic Operators
JavaScript provides several basic operators for performing operations on variables and values. These operators include arithmetic, assignment, comparison, logical, and more.
1. Arithmetic Operators
Arithmetic operators perform mathematical operations on numeric operands.
Addition (+): Adds two operands.
Subtraction (-): Subtracts the second operand from the first.
Multiplication (*): Multiplies two operands.
Division (/): Divides the first operand by the second.
Modulus (%): Returns the division remainder.
Example:
let num1 = 10;
let num2 = 5;
let sum = num1 + num2; // 15
let difference = num1 - num2; // 5
let product = num1 * num2; // 50
let quotient = num1 / num2; // 2
let remainder = num1 % num2; // 0
2. Assignment Operators
Assignment operators assign values to JavaScript variables.
Assignment (=): Assigns the value of the right operand to the left operand.
Addition Assignment (+=): Adds the right operand to the left operand and assigns the result.
Subtraction Assignment (-=): Subtracts the right operand from the left operand and assigns the result.
Multiplication Assignment (*=): Multiplies the left operand by the right operand and assigns the result.
Division Assignment (/=): Divides the left operand by the right operand and assigns the result.
Example:
let x = 10;
x += 5; // x is now 15
x -= 3; // x is now 12
x *= 2; // x is now 24
x /= 4; // x is now 6
3. Comparison Operators
Comparison operators compare two values and return a Boolean result.
Equal (==): Returns true if the operands are equal.
Not Equal (!=): Returns true if the operands are not equal.
Strict Equal (===): Returns true if the operands are equal and of the same type.
Strict Not Equal (!==): Returns true if the operands are not equal or not of the same type.
Greater Than (>): Returns true if the left operand is greater than the right operand.
Less Than (<): Returns true if the left operand is less than the right operand.
Greater Than or Equal (>=): Returns true if the left operand is greater than or equal to the right operand.
Less Than or Equal (<=): Returns true if the left operand is less than or equal to the right operand.
Logical operators are used to combine or negate Boolean values.
Logical AND (&&): Returns true if both operands are true.
Logical OR (||): Returns true if at least one of the operands is true.
Logical NOT (!): Returns the opposite of the operand’s Boolean value.
Example:
let x = 5;
let y = 10;
let z = 15;

console.log(x < y && y < z); // true
console.log(x < y || y > z); // true
console.log(!(x > y)); // true
Math Functions
JavaScript also provides a built-in Math object with a variety of useful mathematical functions.
1. Math.abs()
Returns the absolute (positive) value of a number.
let num = -10;
let absNum = Math.abs(num); // 10
2. Math.pow()
Returns the base to the exponent power.
let base = 2;
let exponent = 3;
let result = Math.pow(base, exponent); // 8 (2^3)
3. Math.sqrt()
Returns the square root of a number.
let number = 16;
let squareRoot = Math.sqrt(number); // 4
4. Math.max() and Math.min()
Returns the maximum or minimum value from a list of numbers.
let maxNumber = Math.max(10, 20, 30); // 30
let minNumber = Math.min(10, 20, 30); // 10
5. Math.round(), Math.floor(), and Math.ceil()
Math.round() rounds a number to the nearest integer.
Math.floor() rounds a number down to the nearest integer.
Math.ceil() rounds a number up to the nearest integer.
let decimal = 5.7;
let rounded = Math.round(decimal); // 6
let floored = Math.floor(decimal); // 5
let ceiled = Math.ceil(decimal); // 6
6. Math.random()
Generates a random number between 0 (inclusive) and 1 (exclusive).
let randomNum = Math.random(); // 0.12345 (example)
Conclusion
JavaScript’s basic operators and math functions are foundational to building dynamic and interactive web applications. By mastering these concepts, you gain the ability to perform arithmetic operations, make comparisons, and utilize powerful math functions. Whether you’re creating a calculator, handling user input, or developing complex algorithms, understanding these fundamentals is key to becoming a proficient JavaScript developer. As you continue your JavaScript journey, these tools will serve as valuable building blocks for creating innovative and functional web experiences.
Demystifying JavaScript Type Conversions: A Comprehensive Guide
JavaScript, as a dynamically-typed language, performs type conversions behind the scenes to accommodate various operations and comparisons. While this flexibility is powerful, it can lead to unexpected behavior if not understood properly. In this guide, we’ll delve into the world of JavaScript type conversions, exploring implicit and explicit conversions, coercion, and best practices.
What are Type Conversions?
Type conversion, also known as type coercion, is the process of converting data from one type to another. JavaScript performs these conversions automatically, either implicitly (done by the language) or explicitly (done by the developer).
Implicit Type Conversion
Implicit type conversion occurs when JavaScript automatically converts a value from one type to another during an operation. This often happens in situations like arithmetic operations or comparisons involving different types.
Example 1: Arithmetic Operations
let num = 10;        // num is a number
let str = "20";      // str is a string

let result = num + str;
console.log(result); // Outputs: 1020 (num is coerced into a string and concatenated)
In this example, num (a number) is implicitly converted to a string to perform concatenation with str.
Example 2: Comparison
let num = 10;       // num is a number
let str = "10";     // str is a string

if (num == str) {
  console.log("Equal");   // Outputs: Equal (str is coerced into a number for comparison)
}
Here, str (a string) is implicitly converted to a number for the comparison operation.
Explicit Type Conversion
Developers can also explicitly convert types using JavaScript’s built-in methods. This gives more control over how conversions occur and is often used to ensure expected behavior.
Example 1: Convert to Number
let str = "10";       // str is a string

let num = Number(str);
console.log(num);     // Outputs: 10
Here, the Number() function explicitly converts the string "10" to a number.
Example 2: Convert to String
let num = 10;         // num is a number

let str = String(num);
console.log(str);     // Outputs: "10"
The String() function converts the number 10 to a string.
Common Conversion Functions
JavaScript provides several functions for explicit type conversions:
Number(): Converts to a number.
String(): Converts to a string.
Boolean(): Converts to a boolean.
parseInt() and parseFloat(): Convert strings to integers or floating-point numbers.
Truthy and Falsy Values
Understanding type conversions is crucial when dealing with truthy and falsy values in JavaScript. JavaScript treats certain values as “falsy” (evaluating to false in a boolean context) and others as “truthy” (evaluating to true in a boolean context).
Falsy Values:
false
0
"" (empty string)
null
undefined
NaN (Not a Number)
Truthy Values:
Any non-empty string
Any number other than 0
Objects (including arrays and functions)
Best Practices
To avoid unexpected behavior and write more predictable code:
Know Your Operators: Understand which operators perform implicit type conversions, such as + for concatenation and == for loose equality.
Use Strict Equality: Prefer === (strict equality) over == (loose equality) to avoid unintended type coercion.
Explicit is Better Than Implicit: When in doubt, use explicit type conversion functions like Number(), String(), or Boolean().
Consider Context: Be aware of the context in which type conversions occur, especially when dealing with conditional statements or function arguments.
Be Consistent: Stick to a consistent approach to type conversions in your codebase to improve readability and maintainability.
Conclusion
JavaScript’s type conversions add flexibility to the language, but they can also lead to subtle bugs if not handled carefully. By understanding implicit and explicit type conversions, knowing common conversion functions, and following best practices, you’ll write more robust and reliable JavaScript code. Whether you’re a beginner or an experienced developer, mastering type conversions is essential for building efficient and bug-free applications in JavaScript.
Exploring JavaScript Data Types: A Comprehensive Guide
JavaScript, the language of the web, provides a rich set of data types to work with. Understanding these data types is essential for writing efficient and bug-free code. Whether you’re new to programming or looking to deepen your knowledge, this blog will serve as a comprehensive guide to JavaScript data types.
What are Data Types?
In programming, data types are classifications that specify the type of data a variable can hold. They determine the values that can be assigned to a variable and the operations that can be performed on those values. JavaScript supports several primitive data types, along with the object and function data types.
Primitive Data Types
JavaScript has six primitive data types:
1. Number
The number data type represents both integer and floating-point numbers.
let age = 30; // Integer
let pi = 3.14; // Floating-point
2. String
The string data type represents a sequence of characters enclosed in single or double quotes.
let firstName = "John";
let lastName = 'Doe';
3. Boolean
The boolean data type represents a logical value of either true or false.
let isStudent = true;
let hasAccount = false;
4. Null
The null data type represents the intentional absence of any value.
let data = null;
5. Undefined
The undefined data type represents a variable that has been declared but has not been assigned a value.
let username;
console.log(username); // Output: undefined
6. Symbol
The symbol data type represents a unique and immutable value that may be used as an identifier for object properties.
JavaScript also has the object data type, which is a collection of key-value pairs. Objects are used to store complex data and are defined using curly braces {}.
let person = {
  firstName: "Alice",
  lastName: "Smith",
  age: 25
};
Working with Data Types
Typeof Operator
The typeof operator is used to determine the data type of a variable or expression.
let num = 10;
let str = "Hello";
let bool = true;

console.log(typeof num); // Output: "number"
console.log(typeof str); // Output: "string"
console.log(typeof bool); // Output: "boolean"
Type Conversion
JavaScript also allows for type conversion between data types.
let x = "10";
let y = "5";

let sum = x + y; // Concatenation
console.log(sum); // Output: "105"

// Using parseInt or parseFloat for arithmetic operations
let num1 = parseInt(x);
let num2 = parseInt(y);
let total = num1 + num2;
console.log(total); // Output: 15
NaN (Not a Number)
NaN is a special value in JavaScript that represents an unrepresentable value resulting from an invalid mathematical operation.
let result = "Hello" / 5;
console.log(result); // Output: NaN
Infinity and -Infinity
JavaScript has special numeric values Infinity and -Infinity, representing positive and negative infinity, respectively.
let largeNumber = Infinity;
let smallNumber = -Infinity;

console.log(largeNumber); // Output: Infinity
console.log(smallNumber); // Output: -Infinity
Best Practices
Use the appropriate data type for your variables to ensure clarity and efficiency.
Be aware of type coercion, where JavaScript automatically converts data types during operations.
Practice checking data types using the typeof operator for debugging and validation.
Conclusion
JavaScript’s data types are the building blocks of any program. Whether you’re working with numbers, strings, booleans, or more complex objects, understanding data types is crucial for writing effective and reliable code. By mastering JavaScript’s data types, you gain the ability to create dynamic and versatile web applications.
As you continue your JavaScript journey, remember to explore more advanced topics such as object-oriented programming, arrays, and functions. The versatility of JavaScript’s data types empowers you to create innovative solutions, from simple web pages to complex web applications. So, embrace the diversity of data types, practice regularly, and unlock the full potential of JavaScript in your development projects.