First C Program

Before starting the abcd of C language, you need to learn how to write, compile and run the first c program.

To write the first c program, open the C console and write the following code:

  1. #include <stdio.h>    
  2. int main(){    
  3. printf(“Hello C Language”);    
  4. return 0;   
  5. }  

#include <stdio.h> includes the standard input-output library functions. The printf() function is defined in stdio.h .

int main() The main() function is the entry point of every program in c language.

printf() The printf() function is used to print data on the console.

return 0 The return 0 statement, returns execution status to the OS. The 0 value is used for successful execution and 1 for unsuccessful execution.

How to compile and run the c program

There are 2 ways to compile and run the c program, by menu and by shortcut.

By menu

Now click on the compile menu then compile sub-menu to compile the c program.

Then click on the run menu then run sub-menu to run the c program.

By shortcut

Or, press ctrl+f9 keys compile, and run the program directly.

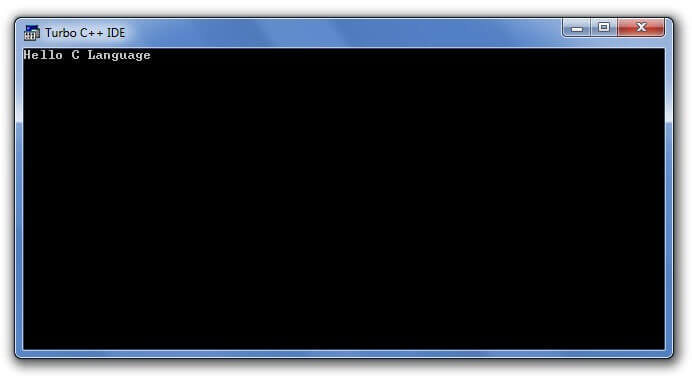
You will see the following output on the user screen.

c program output

You can view the user screen any time by pressing the alt+f5 keys.

Now press Esc to return to the turbo c++ console.

Setting Up C Environment

In this chapter, we are going to learn Environment Setup using IDE in C development environment using DevC++ tool in your machine and how to compile and execute a C program on your own. Below topics are covered on this page.

  1. What is C compiler?
  2. List of C/C++ compilers for Windows Operating System
  3. Steps to install DevC++ tool to compile and execute C programs
  4. List of C/C++ compilers for UNIX/LINUX Operating System

Note:

  • Nowadays, both C and C++ compilers are integrated together in same development environment.
  • For example, Turbo C++, Borland C++ and DevC++ provides Integrated Development Environment with compiler for both C and C++ programming language.
  • So, we can compile and execute both C and C++ programs in same Integrated Development Environment (IDE).

1. WHAT IS C COMPILER?

  • C Compiler is a program that converts human readable code into machine readable code. This process is called compilation.
  • Human readable code is a program that consists of letters, digits and special characters that we type in program window. Machine readable code is in 0’s & 1’s
  • For example, let’s assume that we type ” HELLO” in program window. We know that we have typed “HELLO” in program window.
  • But, processor knows only 01001000 for letter “H”, 01000101 for letter “E”, 01001100 for letter “L”, 01001100 for letter “L”, 01001111 for letter “O”
  • Because, all C programs are executed by processor which is available in CPU.
  • So, entire C source code should be converted into 0’s and 1’s as processor can understand only 0’s and 1’s.
  • So, compiler converts entire source code into 0’s and 1’s during compilation.
  • Output produced by compiler is in the form of 0’s and 1’s which is saved in .exe file. This file is called as executable or binary file.
  • This binary file is executed by processor as per logic written in source code and the output is displayed in output window.

2. LIST OF C/C++ COMPILERS FOR WINDOWS:

There are so many compilers available in the market for Windows operating system. We are listing some of them here for your reference.

1. AMPC
2. CCS C Compiler
3. ch
4. clang
5. Cygwin
6. Digital mars
7. GCC compiler
8. MikroC Compiler
9. Portable C Compiler, Power C, QuickC, Ritchie C Compiler, Small-C

3. STEPS TO INSTALL DEV C++:

Dev C++ is a free C & C++ IDE (Integrated Development Environment) for Windows and Linux.  It supports the compilation and execution of C & C++ languages. It is available with GCC compiler which is used to compile both C and C++ programs.

You can follow the below steps one by one to install Dev C++ in your local machine and you can start compiling and executing C programs.

1. Download Dev-C++ IDE from http://www.bloodshed.net/dev/devcpp.html

2. Click on source forge link under “Downloads -> Dev-C++ 5.0 beta 9.2 (4.9.9.2) (9.0 MB) with Mingw/GCC

3. Save the .exe file in your local machine.

4. Double click on the exe file.

5. Start the installation by clicking the Next button and I Agree on button.

6. Choose the destination folder as “C:\Dev-Cpp” (It is there by default) and click the “Install’ button and finally click the Finish button. You can modify this destination folder path if you want.

7. Once installation is completed, go to your desktop and right-click on My Computer -> properties -> advanced system settings -> advanced tab. Then, click on the “Environment Variables” button and then “New”. You will get a popup window as shown below.

Change the System variable as given below.

Variable name: PATH
Variable value: C:\Dev-Cpp\bin;

8. Once you are done with the above settings, then you can start Dev C++ by clicking start –> Dev C++ as shown below.

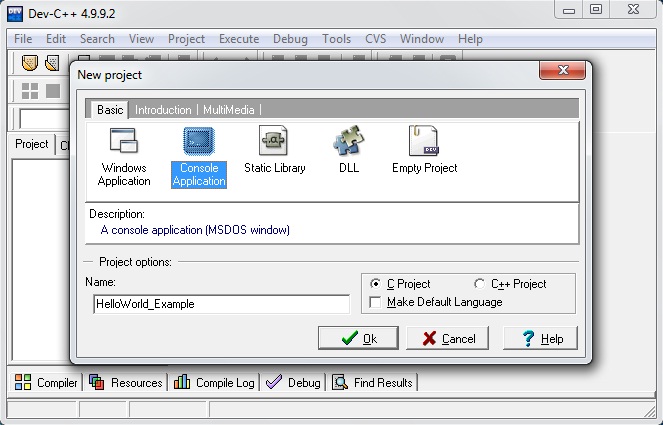
9.Open Dev C++ window and click on file -> new -> project. Then, select Console Application. Choose “C project” and “Make Default Language” check boxes.

10. Click on file -> new -> source file and type a sample program and save it as sample.c

11. Click on the “Compile & Run” button to compile and execute our program as shown below.

12. Output window will be opened as below when there is no compilation error. Use “Enter” button to come back to the program window.

4. LIST OF C/C++ COMPILERS FOR UNIX/LINUX OPERATING SYSTEM:

There are so many compilers available on the market for UNIX/LINUX operating system. We are listing some of them here for your reference.

1. AMPC
2. CCs C compiler
3. ch, clang
4. GCC C compiler
5. Interactive C compiler
6. Mikro C compiler
7. Portable C compiler
8. Small C and XL C Compilers etc.

C & C++ Content Details

Click to Download C C++ ContentDownload

  • The C Language and its Advantages
  • The Structure of a C Program
  • Setting Up C Environment
  • Writing C Programs 
  • Building an Executable Version of a C Program 
  • Debugging a C Program 
  • Examining and Running a C Application Program Data Types and Variables 
  • Data Types 
  • · Operands, Operators, and Arithmetic Expressions Input/Output Management 
  • · The Input/Output Concept 
  • · Formatted Input Function Control-Flow Statements 
  • · The Control-Flow Program Statements 
  • · Looping Statements 
  • · The Data-checking process Modular Programming with Functions 
  • · The C Function 
  • · Passing Data to Functions 
  • · Passing an Address to Modify a Value in Memory 
  • · Using Functions in the Checkbook Program 
  • · C Standard Library Functions Arrays, Pointers, and Strings 
  • · Arrays , Pointers , Strings 
  • · Using Arrays, Strings, and Pointers in the Checkbook Program Structures
  • · Structures 
  • · Arrays of Structures 
  • · Passing Structures to Functions 
  • · Nesting Structures File Input/Output 
  • · Command-line Arguments 
  • · Combining Command-line

C++ Training Syllabus

Introduction to C++
· Creating a project 
· Writing, compiling, and running a program Variables and data types
· Expressions 
· Constants 
· Operators 
· Type conversions Looping constructs: while, do…while, for loops 
· If…else statements 
· Switch/case construct Functions 
· Passing arguments 
· Function prototyping 
· Default argument initializers 
· Inline functions Arrays 
· Array initialization 
· Multi-dimensional arrays 
· Character arrays 
· Working with character strings Storage Classes 
· Global variables Pointers 
· Pointer and arrays 
· Pointers to character strings 
· Arrays of pointers 
· Memory slicing 
· Pointers to functions C++ classes 
· Data members and member functions 
· Creating objects 
· The new and delete operators 
· Friends to a class 
· Class initialization Reference types 
· Reference type arguments 
· Function overloading 
· Operator overloading Copy constructor 
· Assignment operator Template classes 
· Static class members 
· File streams Inheritance 
· Base classes and derived classes 
· Inherited member access 
· Base class initialization 
· Protected members of a class Virtual functions 
· Virtual destructors virtual base classes 
· Virtual base class member access 
· Constructor and destructor ordering Exception handling 
· try…throw…catch block 
· Nested catch handlers

CSS Border Color

The border-color property in CSS is used to set the color of an element’s border. The border is the line that surrounds an element and separates it from other elements on the page.

You can set the border color of an element using the border-color property in your CSS. The property takes one or more values, separated by spaces, to specify the colors of the border on different sides of the element. The values can be specified using a color keyword, such as, or using hexadecimal, RGB, or HSL value.

For example, to set the border color of an element to red, you could use the following CSS:

element {
    border-color: red;
}

You can also set different colors for each side of the border using the border-top-color, border-right-color, border-bottom-color, and border-left-color properties.

For example, to set the top border to red, the right border to green, the bottom border to blue, and the left border to yellow, you could use the following CSS:

element {
    border-top-color: red;
    border-right-color: green;
    border-bottom-color: blue;
    border-left-color: yellow;
}

Alternatively, you can use the border-color property and specify the values in the following order: top right bottom left.

For example:

element {
    border-color: red green blue yellow;
}

You can also use the border property to set the border width, style, and color at the same time. For example:

element {
    border: 2px solid red;
}

This will set the border width to 2 pixels, the border style to solid, and the border color to red.

Note that the border color will only be visible if the border style is not set to none.

CSS Box Model

The CSS box model is a concept that describes the layout of an HTML element on a web page. It consists of the element’s content, padding, border, and margin.

Here is a diagram of the CSS box model:

------------------------------
|                            |
|        margin              |
|                            |
------------------------------
|                            |
|       border               |
|                            |
------------------------------
|                            |
|       padding              |
|                            |
------------------------------
|                            |
|        content             |
|                            |
------------------------------

The content is the element’s actual content, such as text or an image. The padding is the space between the content and the border. The border is a line that surrounds the element and separates it from other elements on the page. The margin is the space between the border and the surrounding elements.

You can use CSS to control the size and appearance of each part of the box model. For example, you can use the padding, border, and margin properties to set the size of the padding, border, and margin, respectively. You can also use the width and height properties to set the size of the content area.

Here is an example of some CSS that sets the padding, border, and margin of an element:

element {
  padding: 10px;
  border: 2px solid black;
  margin: 20px;
}

This CSS will set the padding to 10 pixels, the border to 2 pixels and a solid black style, and the margin to 20 pixels.

You can learn more about the CSS box model and how to use it in your web development projects by consulting the documentation on the W3C website or by searching online for tutorials and resources.

Styling Tables

Tables in HTML are used to display tabular data, such as lists of information or data in rows and columns. You can use CSS to style tables and table elements to change their appearance and layout.

Here are some common ways to style tables and table elements using CSS:

  • Set the background color of the table using the background-color property.
  • Set the width of the table and its cells using the width property.
  • Set the border of the table and its cells using the border property.
  • Set the padding of the table cells using the padding property.
  • Set the text color and font properties of the table cells using the color and font properties.
  • Set the alignment of the text within the table cells using the text-align property.

Here is an example of some CSS that styles a table:

table {
  width: 100%;
  border: 1px solid black;
}

td {
  padding: 10px;
  text-align: center;
  border: 1px solid black;
}

th {
  background-color: lightgray;
  font-weight: bold;
  border: 1px solid black;
}

This CSS will set the width of the table to 100% of its container, add a 1px solid black border to the table and its cells, set the padding of the cells to 10px, align the text in the cells to the center, and give the table header cells a lightgray background and bold font weight.

You can also use CSS classes and IDs to style specific tables or table elements on your page. For example, you could give a table an ID of “customers” and use the ID selector to style that specific table:

#customers {
  width: 50%;
  border: 2px solid red;
}

This would set the width of the table with an ID of “customers” to 50% of its container and give it a 2px solid red border.

You can learn more about styling tables and other HTML elements using CSS by consulting the documentation on the W3C website or by searching online for tutorials and resources.

CSS Selectors

CSS selectors are patterns used to select elements in an HTML or XML document. These patterns, also known as selectors, allow you to apply styles to specific elements on your web page.

There are several different types of CSS selectors, including:

  • Type selectors: Select elements based on their tag names. For example, p selects all <p> elements in the document.
  • Class selectors: Select elements based on their class attributes. For example, .warning selects all elements with a class of “warning”.
  • ID selectors: Select elements based on their ID attributes. For example, #main selects the element with an ID of “main”.
  • Attribute selectors: Select elements based on their attribute values. For example, [href='http://example.com'] selects all elements with an href attribute equal to “http://example.com“.
  • Pseudo-class selectors: Select elements based on their state or position. For example, :hover selects elements when the user hovers over them with the mouse cursor.
  • Pseudo-element selectors: Select specific parts of elements. For example, ::before selects the content before an element.

You can also combine selectors to create more specific patterns. For example, #main p.warning selects all <p> elements with a class of “warning” that is inside an element with an ID of “main”.

To apply a style to an element using a CSS selector, you can use the style attribute in the HTML element, or you can use a stylesheet and define the style in a style element or in an external file with a .css extension.

For example, to make all <p> elements red, you could use the following CSS:

p {
    color: red;
}

Or, to make all elements with a class of “warning” bold and yellow, you could use the following CSS:

.warning {
    font-weight: bold;
    color: yellow;
}

You can learn more about CSS selectors and how to use them in your web development projects by consulting the documentation on the W3C website or by searching online for tutorials and resources.

CSS Syntax

CSS (Cascading Style Sheets) is a stylesheet language that is used to describe the appearance and layout of a document written in HTML or XML. CSS allows you to apply styles, such as colors, fonts, and layouts, to your web pages in a separate file, called a stylesheet, which makes it easier to maintain and update your site’s design.

The syntax of CSS consists of rules, which specify how the styles should be applied to the elements in your document. A rule consists of a selector, which specifies the elements to which the styles should be applied, and a declaration block, which contains one or more declarations that specify the styles to be applied.

Here is an example of a simple CSS rule:

h1 {
  font-size: 32px;
  color: blue;
  text-align: center;
}

In this example, the selector is h1, which specifies that the styles should be applied to all <h1> elements in the document. The declaration block contains three declarations: font-size, color, and text-align. Each declaration consists of a property, such as font-size or color, and a value, such as 32px or blue.

You can also specify multiple rules in a stylesheet. For example:

h1 {
  font-size: 32px;
  color: blue;
  text-align: center;
}

p {
  font-size: 18px;
  color: black;
  text-align: left;
}

This stylesheet contains two rules: one for <h1> elements and one for <p> elements.

You can apply stylesheets to your HTML documents using the <link> element in the <head> of the document, like this:

<head>
  <link rel="stylesheet" href="/styles.css">
</head>

You can also apply styles directly to an HTML element using the style attribute:

<h1 style="font-size: 32px; color: blue; text-align: center;">This is a heading</h1>

You can learn more about CSS syntax and how to use it in your web development projects by consulting the documentation on the W3C website or by searching online for tutorials and resources.

Functions

Mastering JavaScript Functions: The Building Blocks of Dynamic Code

Functions in JavaScript are powerful tools that allow you to encapsulate reusable blocks of code, making your programs more efficient, modular, and maintainable. Whether you’re a beginner or an experienced developer, understanding JavaScript functions is essential for writing clean and structured code. In this blog, we’ll explore the ins and outs of JavaScript functions, including their syntax, types, best practices, and common use cases.

What is a Function?

In programming, a function is a block of code that performs a specific task or calculates a value. It allows you to define a set of instructions that can be executed multiple times with different inputs. Functions help organize code into logical units, promote code reusability, and improve readability.

Declaring a Function

The syntax for declaring a function in JavaScript is straightforward:

function functionName(parameters) {
  // Code block to be executed
  return result; // Optional: Return a value
}

Let’s create a simple function that calculates the square of a number:

function square(number) {
  return number * number;
}

let result = square(5);
console.log("Square of 5:", result); // Output: Square of 5: 25

Function Parameters and Arguments

Functions can take parameters, which are placeholders for values passed into the function when it is called. These values are called arguments. Here’s an example:

function greet(name) {
  console.log("Hello, " + name + "!");
}

greet("Alice"); // Output: Hello, Alice!

Default Parameters

You can also set default parameter values for functions, which will be used if no argument is provided:

function greet(name = "Guest") {
  console.log("Hello, " + name + "!");
}

greet(); // Output: Hello, Guest!
greet("Bob"); // Output: Hello, Bob!

Return Statement

The return statement is used to specify the value that the function should return. A function can have multiple return statements, but only one will be executed:

function isEven(number) {
  if (number % 2 === 0) {
    return true;
  } else {
    return false;
  }
}

console.log(isEven(4)); // Output: true
console.log(isEven(7)); // Output: false

Function Expressions

In addition to the traditional function declaration, you can also create functions using function expressions. These are often used for functions that are not needed elsewhere in the code:

let multiply = function(x, y) {
  return x * y;
};

console.log(multiply(3, 4)); // Output: 12

Arrow Functions (ES6+)

Arrow functions provide a more concise syntax and lexical scoping of this. They are especially useful for one-liner functions:

let square = (number) => number * number;

console.log(square(6)); // Output: 36

Common Use Cases

  • Data Processing:
  function calculateTotal(price, quantity) {
    return price * quantity;
  }

  let total = calculateTotal(10, 3); // Output: 30
  • Event Handling:
  button.addEventListener("click", function() {
    alert("Button clicked!");
  });
  • Iterating Over Arrays:
  let numbers = [1, 2, 3, 4, 5];
  let squaredNumbers = numbers.map((num) => num * num);

Best Practices

  • Descriptive Names: Use meaningful names for functions to convey their purpose.
  • Single Responsibility: Each function should perform a single task for better maintainability.
  • Avoid Side Effects: Functions should ideally only modify local variables and return values rather than affecting external states.
  • Commenting: Add comments to explain the purpose of the function, parameters, and return values.

Conclusion

JavaScript functions are the building blocks of dynamic and modular code. By encapsulating logic into reusable units, functions make your code more organized, readable, and efficient. Whether you’re creating simple calculations, handling user interactions, or processing data, functions play a vital role in every JavaScript program.

As you continue your JavaScript journey, practice creating functions for various tasks. Experiment with different types of functions, such as arrow functions and function expressions, to gain a deeper understanding of their flexibility and usage. With a solid grasp of JavaScript functions, you’re equipped to tackle a wide range of programming challenges and build robust and scalable applications. So, embrace the power of functions, and let them guide you towards cleaner and more elegant code solutions.
The “switch” statement

Exploring the JavaScript switch Statement: A Comprehensive Guide

In JavaScript, the switch statement is a powerful tool for executing different blocks of code based on multiple possible conditions. This control flow statement provides an alternative to if-else chains when you have a series of conditions to evaluate. In this blog, we’ll dive into the switch statement, its syntax, use cases, and best practices.

The switch Statement Syntax

The switch statement evaluates an expression, matching its value to a case clause. If a match is found, the associated block of code is executed. If no match is found, an optional default case can be used to specify code to execute. Here’s the basic syntax:

switch (expression) {
  case value1:
    // Code block to execute if expression matches value1
    break;
  case value2:
    // Code block to execute if expression matches value2
    break;
  // Add more case statements as needed
  default:
    // Code block to execute if no case matches
}

Example: Using switch Statement

Let’s consider an example where we want to display a message based on the day of the week:

let dayOfWeek = 2;
let message;

switch (dayOfWeek) {
  case 1:
    message = "Today is Monday";
    break;
  case 2:
    message = "Today is Tuesday";
    break;
  case 3:
    message = "Today is Wednesday";
    break;
  case 4:
    message = "Today is Thursday";
    break;
  case 5:
    message = "Today is Friday";
    break;
  case 6:
    message = "Today is Saturday";
    break;
  case 7:
    message = "Today is Sunday";
    break;
  default:
    message = "Invalid day of the week";
}

console.log(message); // Output: "Today is Tuesday"

In this example:

  • The dayOfWeek variable is set to 2, representing Tuesday.
  • The switch statement evaluates dayOfWeek against each case.
  • When case 2 is matched, the corresponding message is assigned to message.
  • The break statement is crucial as it exits the switch block once a case is matched. Without it, execution would continue into subsequent cases.

Using switch with String Values

The switch statement can also be used with string values in JavaScript, which is a feature not available in some other programming languages. Here’s an example:

let fruit = "apple";
let message;

switch (fruit) {
  case "apple":
    message = "You chose an apple";
    break;
  case "banana":
    message = "You chose a banana";
    break;
  case "orange":
    message = "You chose an orange";
    break;
  default:
    message = "Unknown fruit";
}

console.log(message); // Output: "You chose an apple"

Common Use Cases

  • Menu Selection: Responding to different menu selections in a web application.
  • State Management: Handling different states in a game or application.
  • Error Handling: Providing specific error messages based on different error codes.

Best Practices

  • Use break Statements: Always include break statements to prevent “fall-through” behavior.
  • Default Case: Include a default case for handling unexpected or unhandled values.
  • Avoid Complex Conditions: switch statements work best with simple equality comparisons, not complex conditions.

Nested switch Statements

Just like if statements, switch statements can be nested within each other for more complex scenarios. However, nesting should be done cautiously to maintain readability.

Conclusion

The switch statement in JavaScript provides a concise and structured way to handle multiple conditions. Whether you’re working with numerical values, strings, or even other types, switch offers a clean and efficient alternative to lengthy if-else chains.

As you become more comfortable with JavaScript, incorporating switch statements into your code can lead to clearer, more organized logic. Remember to use break statements to avoid unintended fall-through and always include a default case for handling unexpected values.

So, the next time you find yourself in a situation where you need to execute different blocks of code based on various conditions, reach for the switch statement. With its flexibility and readability, it’s a valuable tool in your JavaScript programming arsenal.